


Carolyn J. Braden • 3 Minute Read
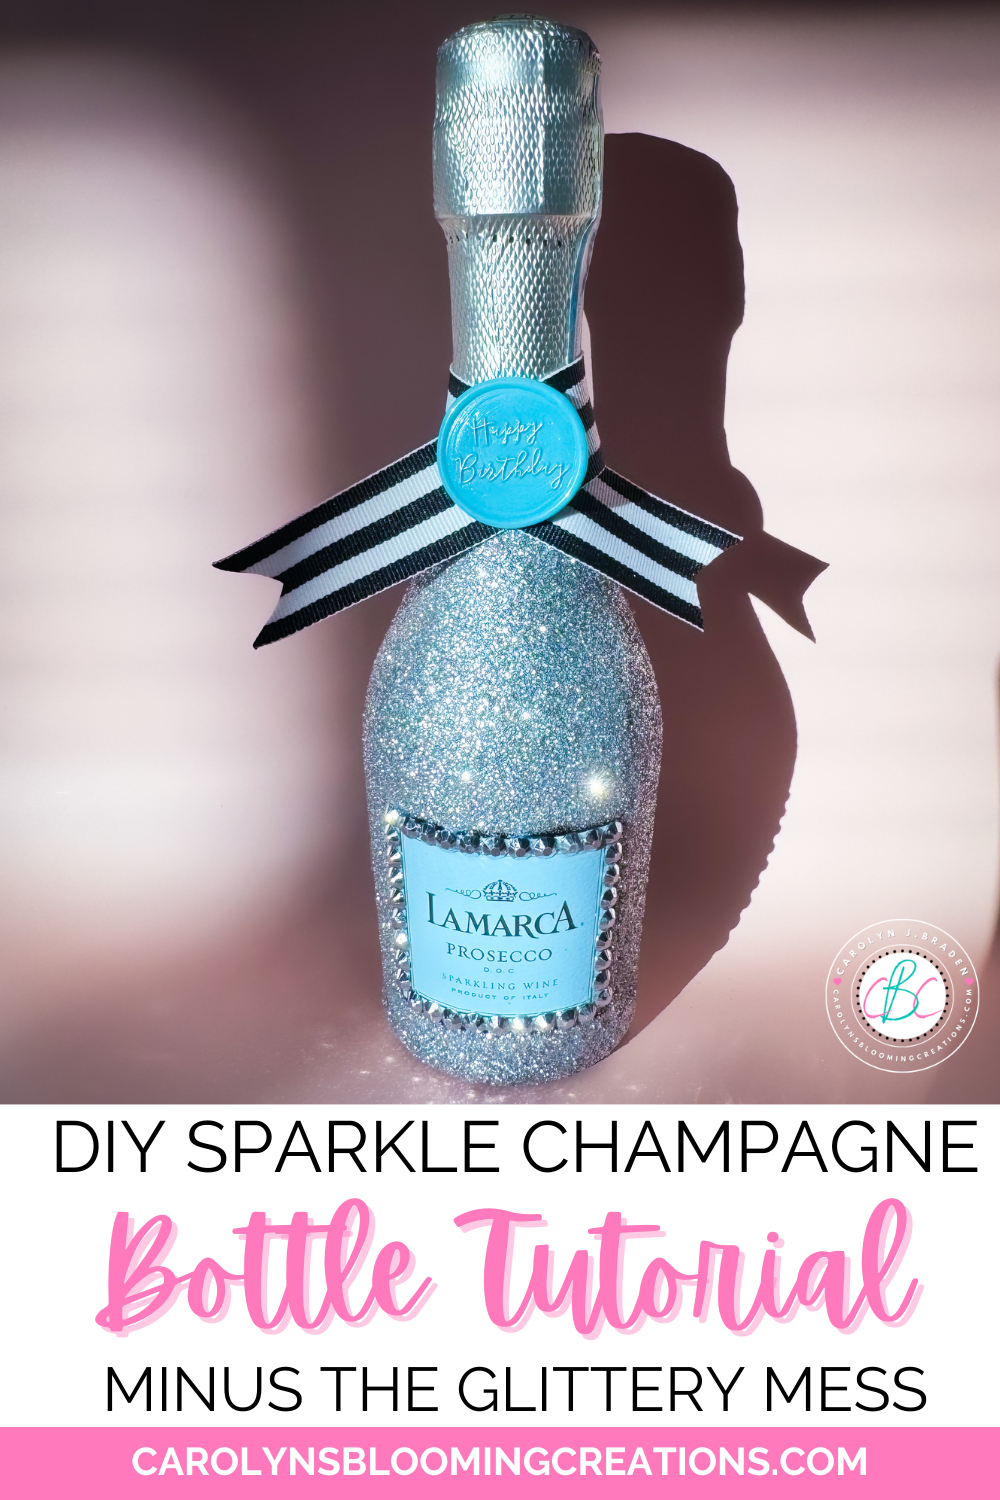
DIY Sparkle Champagne Bottle Minus the Glittery Mess!
Want to make a glamorous champagne bottle, sparkling wine or a sparkling apple cider bottle without the chaos of loose glitter? This DIY sparkle champagne bottle tutorial shows you how to add shimmer and shine the clean way—perfect for parties, gifts, or New Year’s Eve! Learn easy, mess-free methods using sealants and sparkle alternatives for a stunning result that stays put.
Shop the Post
See this project video tutorial and get supplies for this via my Amazon shop here.

This bottle is great for special events
The Messy Inspiration
I’ve seen the sparkle champagne bottles on my Pinterest feed for several years now. All the tutorials call for using Mod Podge for everything from making the glitter stick to sealing it, but I knew I could do it better. See, Mod Podge is a great glue for making things stick, but it is not a good sealant. I know this from all my years crafting AND from being an art teacher for over 10 years with a Master’s degree in Art Education.
I’ve tested Mod Podge as a sealant many times and it always causes projects to stick to things over time even though the bottle says it can be used to seal crafts. It’s great as a glue, but not a sealant in my opinion. When wanting to seal glitter crafts, painted crafts and more crafts (especially holiday crafts!), there are better sealants and I found the perfect one when creating this glitter bottle craft.

The sun hit my bottle and was just so beautiful!
Why Make a Sparkle Champagne, Wine or Apple Cider Bottle?
I was drawn to experiment with this craft for my hair stylist’s birthday. I used a small bottle of LaMarca Prosecco, which is a mild tasting sparkling wine. You could do this project with any glass bottle, glass, jar and more and gift it or keep it for yourself. These bottles can be gifted to commemorate a big special occasion like a wedding, buying a new house, getting a new job or promotion and more.

The back of the glitter bottle
Glitter Makes Me Happy
I’m all for making things look prettier and glitter always does that for me. I created this as an experiment, and when it was done, I was so happy with how it turned out. Just looking at how the glitter caught the sunlight just brought joy to my mind. If you have anyone that loves sparkle, definitely make this for them!
While you are making a bottle, make a giant friendship bracelet banner too! See my tutorial here or via my Youtube channel @carolynjbraden below:
When Glitter Doesn’t Make Me Happy
The primary reason I experimented with this craft is because I wanted to see if I could come up with an alternative to the always recommended Mod Podge in other tutorials to seal the glitter. I do not like making a glitter project, then having all the glitter come off on my fingers when touching it. It gets everywhere!
I had some Aleene’s Acrylic Sealer in Super Gloss Finish on hand and learned it was the KEY to making the glitter stay on the bottle and not on your fingers. A few shimmers came off when I first touched it, but didn’t shed after that. Yay!
How to Make a DIY Sparkle Champagne Bottle
Now for the tutorial. As I said earlier, you can make this with an alcohol-free beverage too. I’ve bought plenty of sparkling grape and apple cider over the years, and you can too. I created my small glitter bottle in about 1.5 hours, but if you make a larger one, it will take you a bit longer. All the buying links below link out to Amazon, Walmart or Target.
Alternative Glitter Idea
Don’t want to use glitter? Try applying rhinestones to the entire bottle. It will take a while, but will be super sparkly too! You could also spread a glitter glue onto the bottle (using several coats) or a glitter acrylic paint. If you choose to paint your bottles, still seal them with the acrylic sealer.

The completed glitter bottle
Check out my 1-minute video tutorial for this project on my TikTok now or via my YouTube channel @carolynjbraden!
Supplies:
Rubbing Alcohol/cotton ball
Wine bottle, sparkling cider bottle, sparkling wine, or champagne bottle
Mod Podge Gloss Sealer (Get it on Amazon or via Walmart)
Extra Fine Glitter (Get it on Amazon or my came from Walmart)
Sponge and regular craft brushes (Amazon or this is a great set for $5 at Target)
Paper towels
Optional:
Aleene’s Liquid Fusion Glue (Amazon or via Walmart)
Wax Tip Pencil (Amazon)
Rhinestones (I used this kit from Amazon)
Wax seal kit (I used this one from Amazon)
Scissors

Removing oils with the alcohol
I first used a cotton ball and some alcohol to remove any oil left on the bottle from my fingers. This helps the Mod Podge and glitter stick better.

Applying the Mod Podge
Next I applied a thin layer of Mod Podge using a sponge craft brush to the front of the bottle, avoiding labels. Before it dried, I sprinkled on a layer of the glitter (protecting my work surface with paper towels). I then did the same to the back of the bottle. Working in small sections works best.
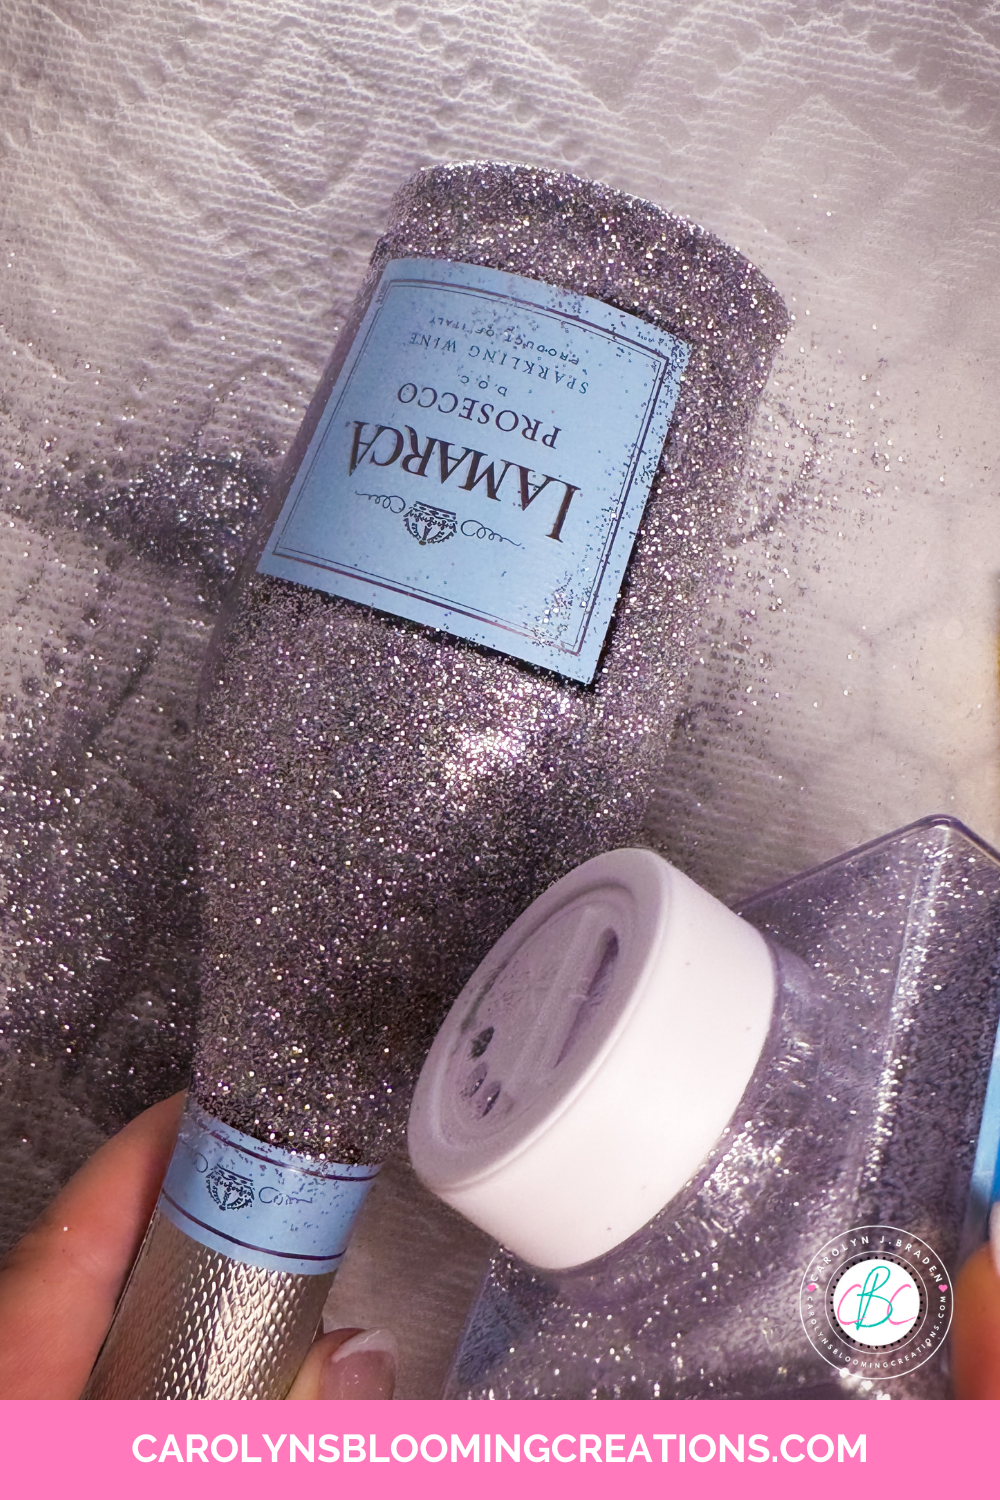
Adding the first layer of glitter
Let it dry for 30 minutes.
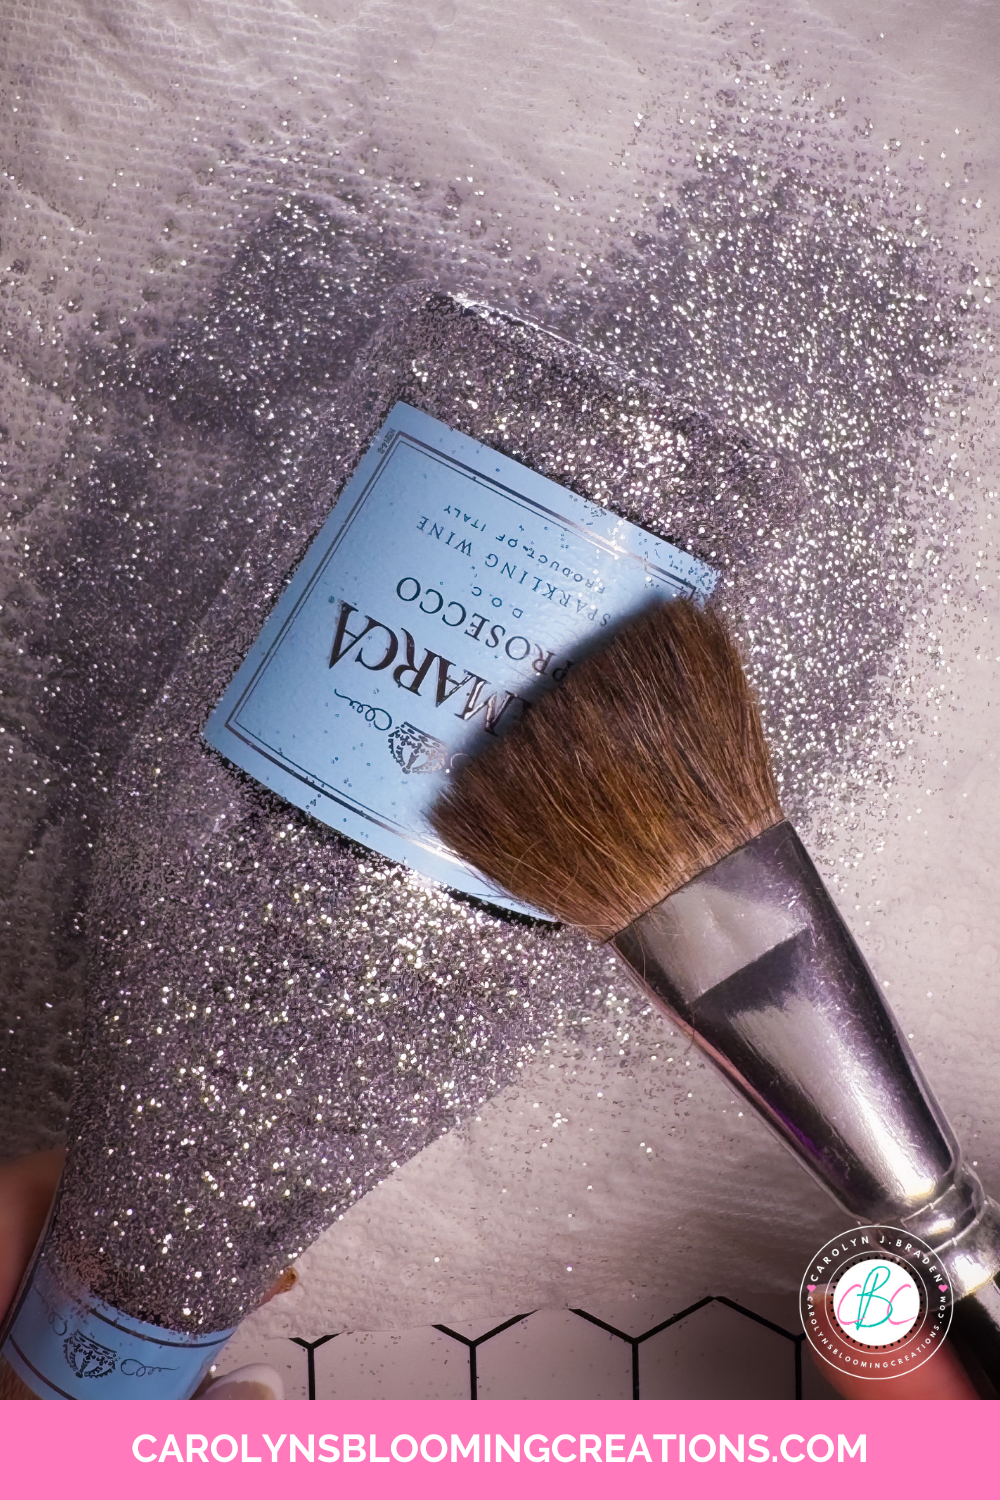
Brushing away the excess glitter
I used a fluffy brush to brush away loose glitter, then applied a second coat of Mod Podge, then another layer of glitter all over the bottle to really get a good, solid coating.
Applying the second coat of Mod Podge
I used the fluffy brush to brush away loose glitter only from the label areas at this point and I let it dry for 30 minutes.

New Year’s Eve could be perfect for a bottle like this
Next, I added some Liquid Fusion glue around the front label and used a wax tip pencil to apply rhinestones. I let them dry for about 30 minutes.

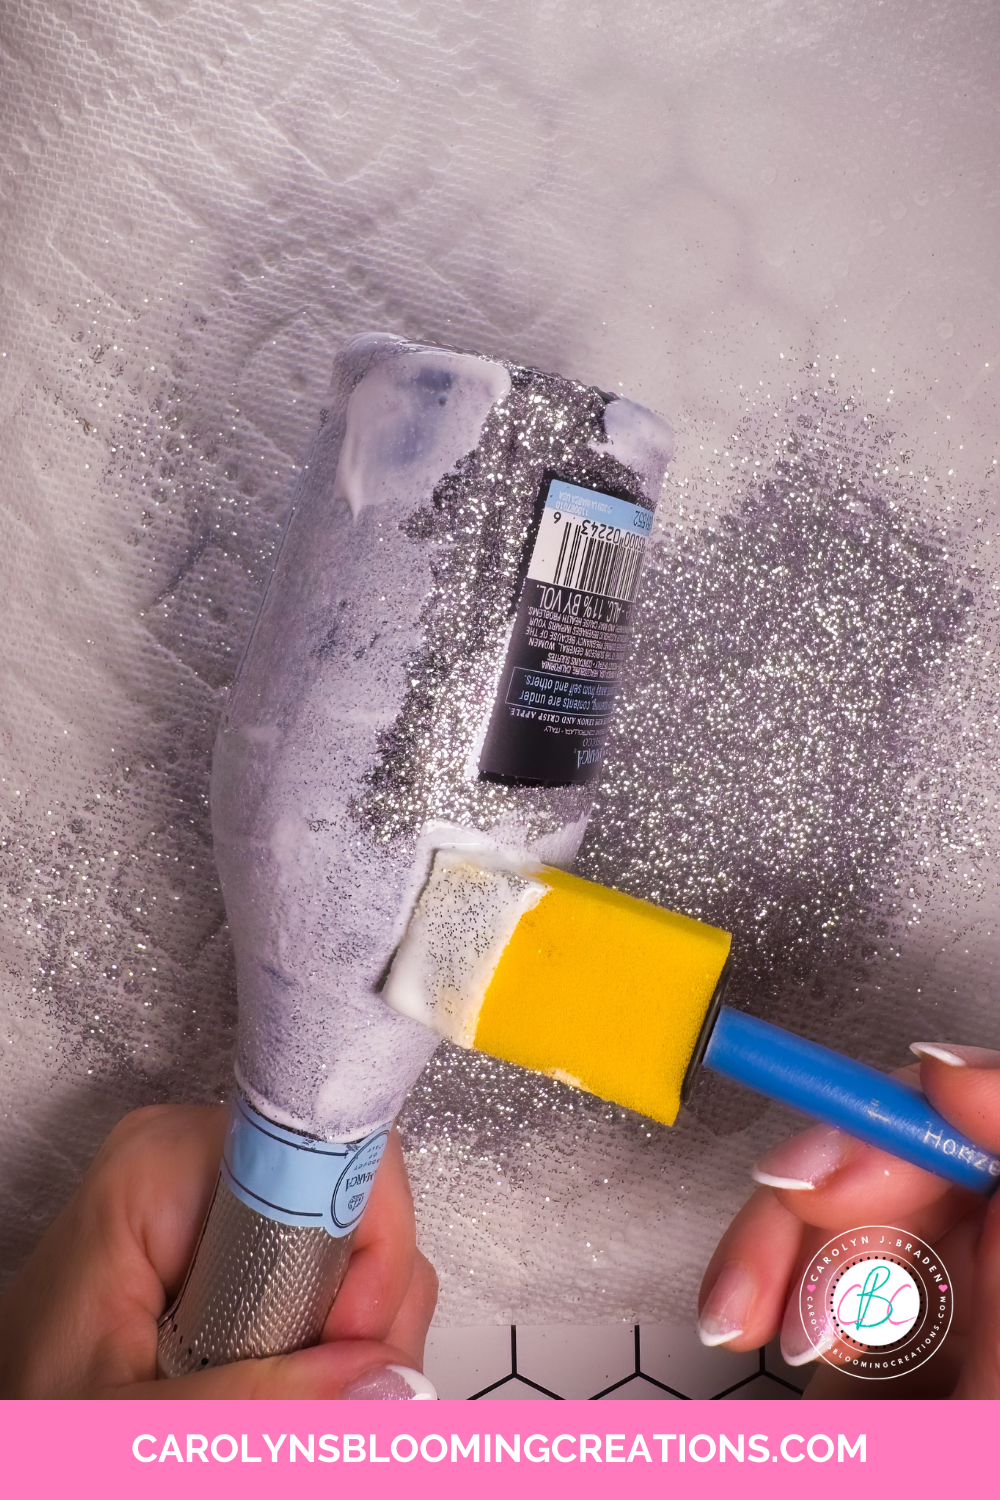
The best sealer for this shimmering bottle
I took the bottle outside and sprayed on the acrylic sealer. It has a smell, so spraying it outside is best. I let it dry for about 15 minutes.

Sealing the ends of the ribbon to prevent fraying
While the bottle was drying, I prepped a piece of ribbon by cutting the ends at a diagonal and used a swift swipe of a lighter (keep it away from the bottle/glue!) to seal it the ends. This is a trick I learned for my ribbons I had to wear in my hair as a cheerleader and it works!
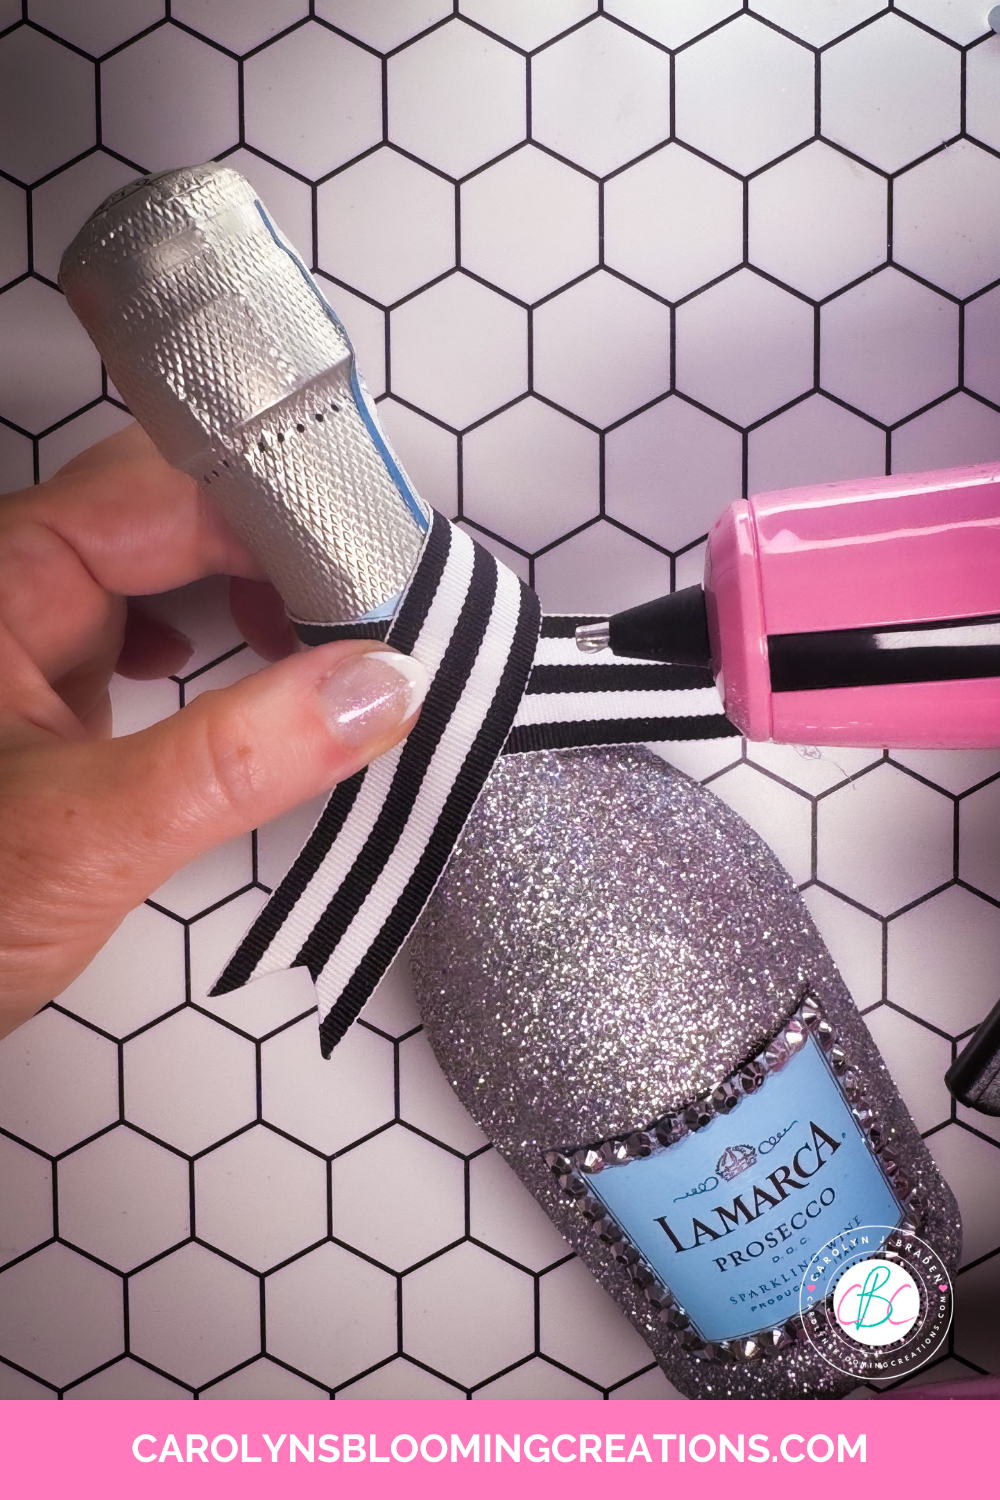
Adding the ribbon
I wrapped the ribbon around the bottle’s neck, using hot glue to secure it.
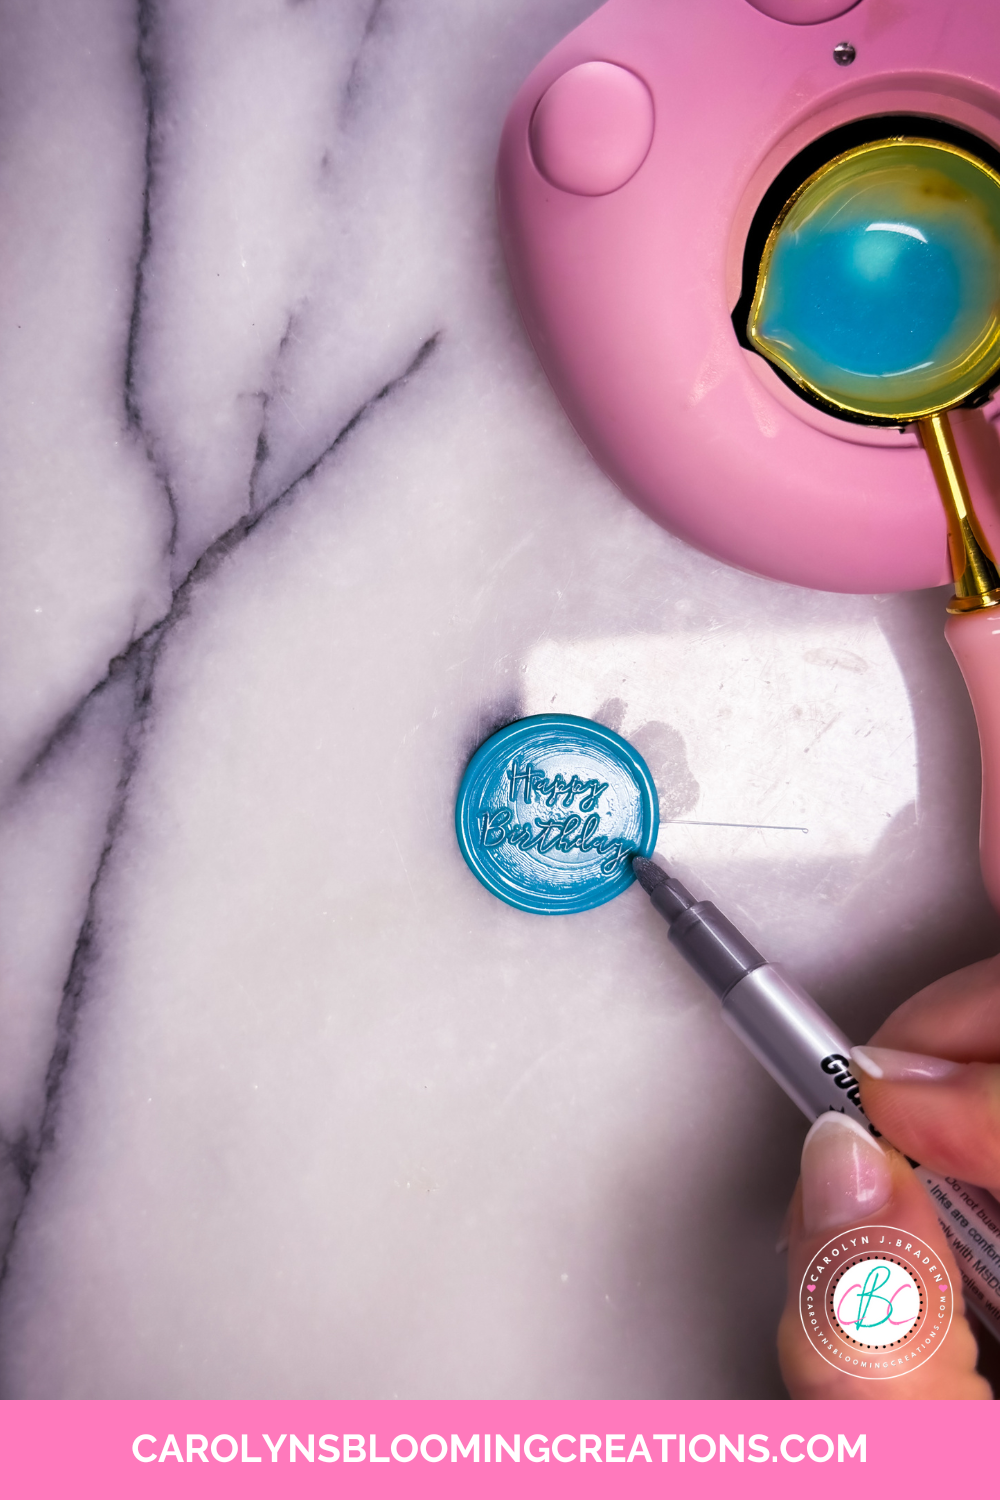
Crafting the wax seal
I made a “happy birthday” wax seal (see how I make wax seals in this article) on my stone plate (I didn’t want to do it on the bottle due to its curves), matching the wax to the bottle label, removed it from the plate, used a silver paint pen to accent the letters, then used hot glue to apply it on the ribbon.

When sealed, it has no messy glitter!
I let it dry overnight and gifted it to my stylist for her birthday and she loved it! It was hard for me to part with it because it was so pretty, but I will be making more of these! Depending on what I gift, bottle-wise, I’ll always match the label, glitter and ribbon to be cohesive in design.
If you loved this article, then we know you’ll love this one too: How to Sparkle, Slay and Shine in DIY Baddie Era Sunglasses
I encourage you to try the project with your own creative twists and share your creations on your social accounts! If you tag me using @carolynsbloomingcreations or @carolynjbraden, I’ll see it! Or tell me about it in the comments below.
Carolyn J. Braden is the owner of Carolyn’s Blooming Creations is a regular contributor and editor for CBC. She has been featured in numerous media publications such as InStyle Magazine, on HGTV, on Bustle.com, and more. She is the author of the books Georgia McMasters in Amethyst Lake Cemetery, How To Be Yourself: 3 Ways To Help You Being You, and the illustrator for the children’s book Bridging Connections. She is a former classroom teacher that now dedicates her life to educating others on how to live their most healthy, creative and happy life. Learn more about her visiting our About Us page.