


Carolyn J. Braden • 3 Minute Read

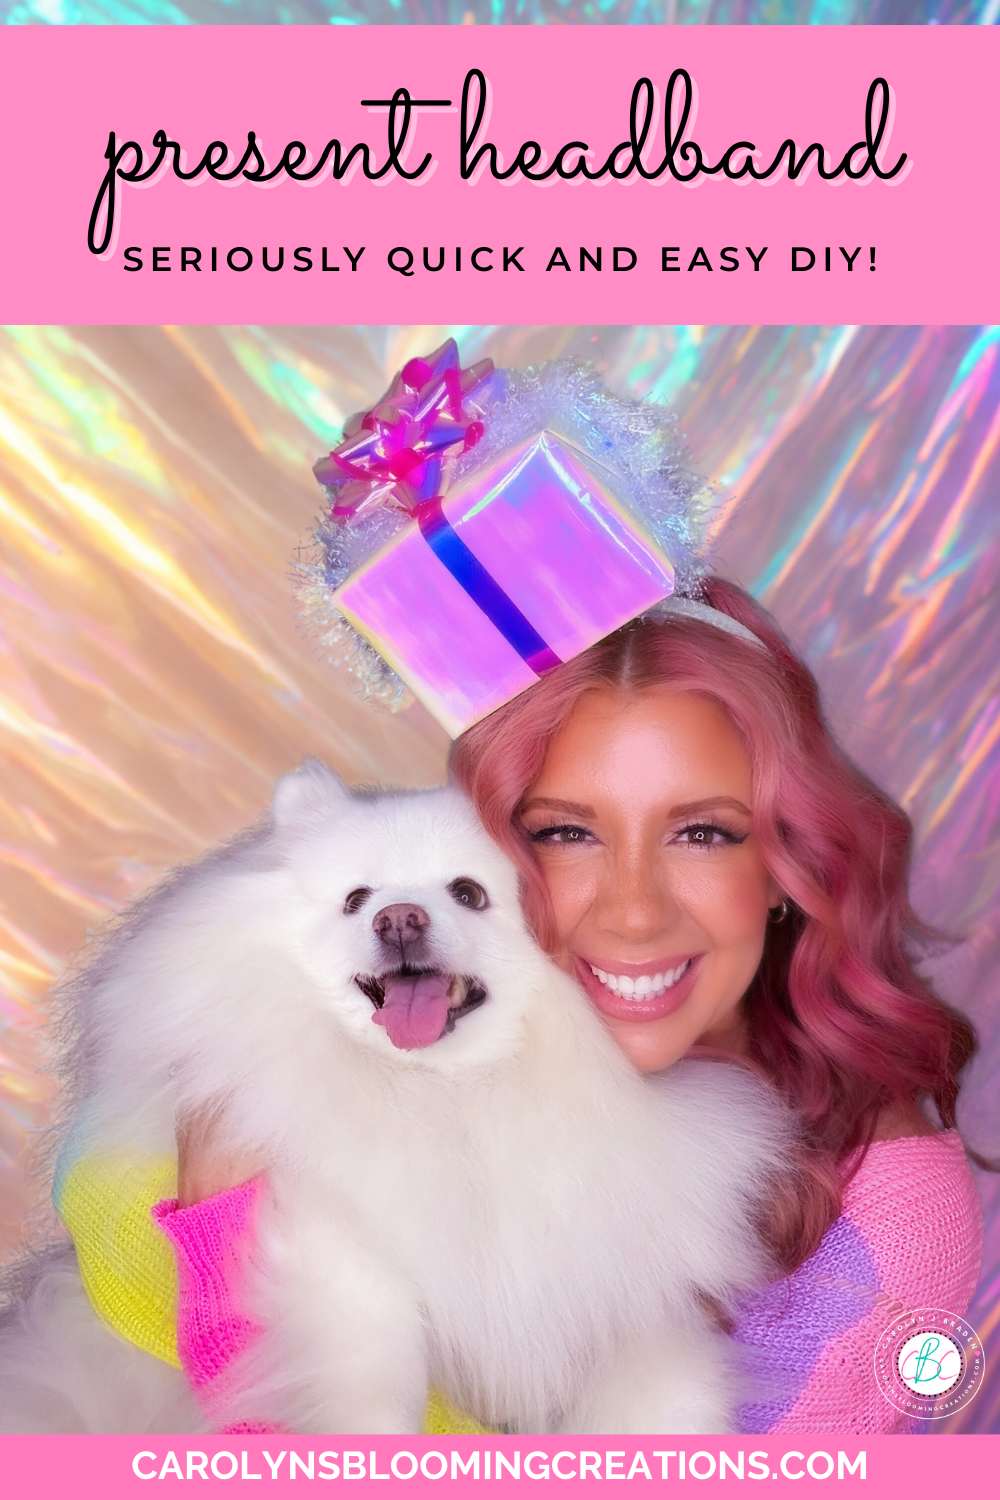
How to Make a Present Headband That Instantly Steals the Show (Holiday + Birthday DIY)
Learn how to make an adorable present headband that’s perfect for holidays, birthdays, and festive parties. This easy DIY tutorial uses simple supplies and delivers major wow-factor for photos, gifting moments, and celebrations. Customize it with a smaller gift box or larger for so much DIY headwear fun! It’s cute, budget-friendly, beginner-approved, and absolutely super cute…let’s make it!
Shop the Post
Don’t feel like reading this article? That’s okay! See my craft come together via my Amazon Shop (coming soon!) plus get buying links at affordable prices!
Bookmark or Pin this one by clicking the Pinterest SAVE button on the images in this article for DIY magic in an instant.

My finished headband
The Creative Inspiration
I went to dinner with my husband and a friend and a server at the restaurant was wearing a cute gift box headband for Christmas. I LOVED IT! The gift box was small, which was very easy to wear. She sweetly let me take a photo and after chatting with her, I wondered if I could make my own version that was just as easy to wear, but in new colors and a bigger size, because, well, bigger is better, right! LOL!

It’s an easy holiday craft!
I decided I wanted mine to be able to be worn for Christmas or my birthday, just like my JOY hat that I made in iridescent colors for my birthday in 2025. I have a friend that has a New Year’s Eve Eve birthday, so she was also inspiration for this.
See the JOY hat tutorial here or below via my YouTube channel @carolynjbraden:
Why You’ll Love This DIY Present Headband
🎁 Perfect for holidays and birthdays
✨ Easy DIY with simple craft supplies
📸 Super photogenic for Instagram, TikTok, and party pics
💰 Budget-friendly and customizable
🕒 Comes together in under 30 minutes
This is one of those crafts that looks high-effort but is secretly so easy.

Link to make my wand is at the end of this post!
Fun Ways to Customize Your Present Headband
You can wear this present or gift box headband on so many occasions, depending on colors you use! Make one or make several—they’re addictive.
Here are some ideas:
🎄 Holiday version: red, green, gold, or silver ribbon
🎉 Birthday Party version: bright colors, confetti patterns, or sparkles
❄️ Winter party: white, icy blue, and metallic accents
🎀 Kids’ version: mini presents or double bows
✨ Glam version: rhinestones, pearls, or glitter ribbon

I love how this turned out!
When to Wear a Present Headband
Holiday parties
Birthday celebrations (We love this $10 Create Your Own banner kit from CVS!)
Classroom parties
Christmas morning photos
Social media content days
It’s the easiest way to look festive without overthinking your outfit.
Styling Tips for Maximum Impact
When I was making mine, I wondered what I could wear with it due to its iridescent colors. I choose a pastel rainbow sweater that I love, and it matched perfectly. Pair your present headband with:
A cozy sweater or holiday sweatshirt
A simple dress for birthdays
Neutral outfits so the headband pops
Matching ribbon colors to your outfit for extra polish
Here are some of my PINK LILY (the cutest line!) fashion loves via my shop my store.
Maybe I should make Minnie Pearl a tiny version!
How to Make a Present Headband for Holiday and Birthday Joy
If you’ve ever wanted to be the gift, this DIY present headband is about to become your new favorite accessory. Whether you’re celebrating the holidays, a birthday, or just showing up to a party with main-character energy, this festive headband adds instant joy with minimal effort.
It’s cute, budget-friendly, beginner-approved, and absolutely perfect for photos, parties, and gifting moments.
Check out my 1-minute video tutorial for this project on my TikTok now or coming soon here and to my YouTube channel @carolynjbraden!
Links go out to either Amazon, CVS, Walmart, Sam’s Club, Target, or Temu, where we source our supplies based on budget/pricing.
Supplies You’ll Need
You probably already have most of these on hand:
Gift box (I used 5x5x3.5, but you can use smaller)
½” to 1 inch wide headband (plastic or fabric-wrapped works best, Walmart also has them)
Matching ribbon to wrap the headband and the gift (if desired)
Thick craft felt, or lightweight cardboard
Scissors and tape
Wrapping paper (I loved my iridescent paper I chose from Amazon!)
Optional décor/embellishments (I used iridescent garland and an iridescent bow from this set from Amazon)
Pro tip: Match your ribbon and colors to the holiday or birthday theme for a cohesive look.

Wrapping the headband to match the wrapping paper
Step-by-Step Tutorial
Step 1: Wrap the Headband with Matching Ribbon
Since my gift wrap was iridescent, I wrapped my headband with iridescent ribbon. I started at one end, glued some ribbon to the headband, then wrapped the entire thing, gluing only periodically to make sure it stayed wrapped. After wrapping, I trimmed the ribbon and glued the other end to the headband.

Taping the box to ensure it stays closed while wrapped
Step 2: Create the “Present” Base
Grab a small box. This will be the base of your present. Tape it up as needed to keep it closed.

Hot glue will last longer than tape
Wrap it with wrapping paper, felt, or glitter paper using hot glue. You could use tape, but it may not hold up long term.

Adding some ribbon to the gift box
Step 3: Add the Ribbon Details
I hot glued gift wrap ribbon horizontally (you can also glue a vertical ribbon piece on too) across the present to mimic wrapped gift lines. Trim neatly and secure it with hot glue on the bottom of the gift.

Tracing out a felt square
Step 4: Cut the Felt
I used the wrapped box to trace out a square onto the felt using a fabric marking pencil, but a pencil will work too.
I used scissors to cut out the square and trimmed it to fit the headband and giftbox.
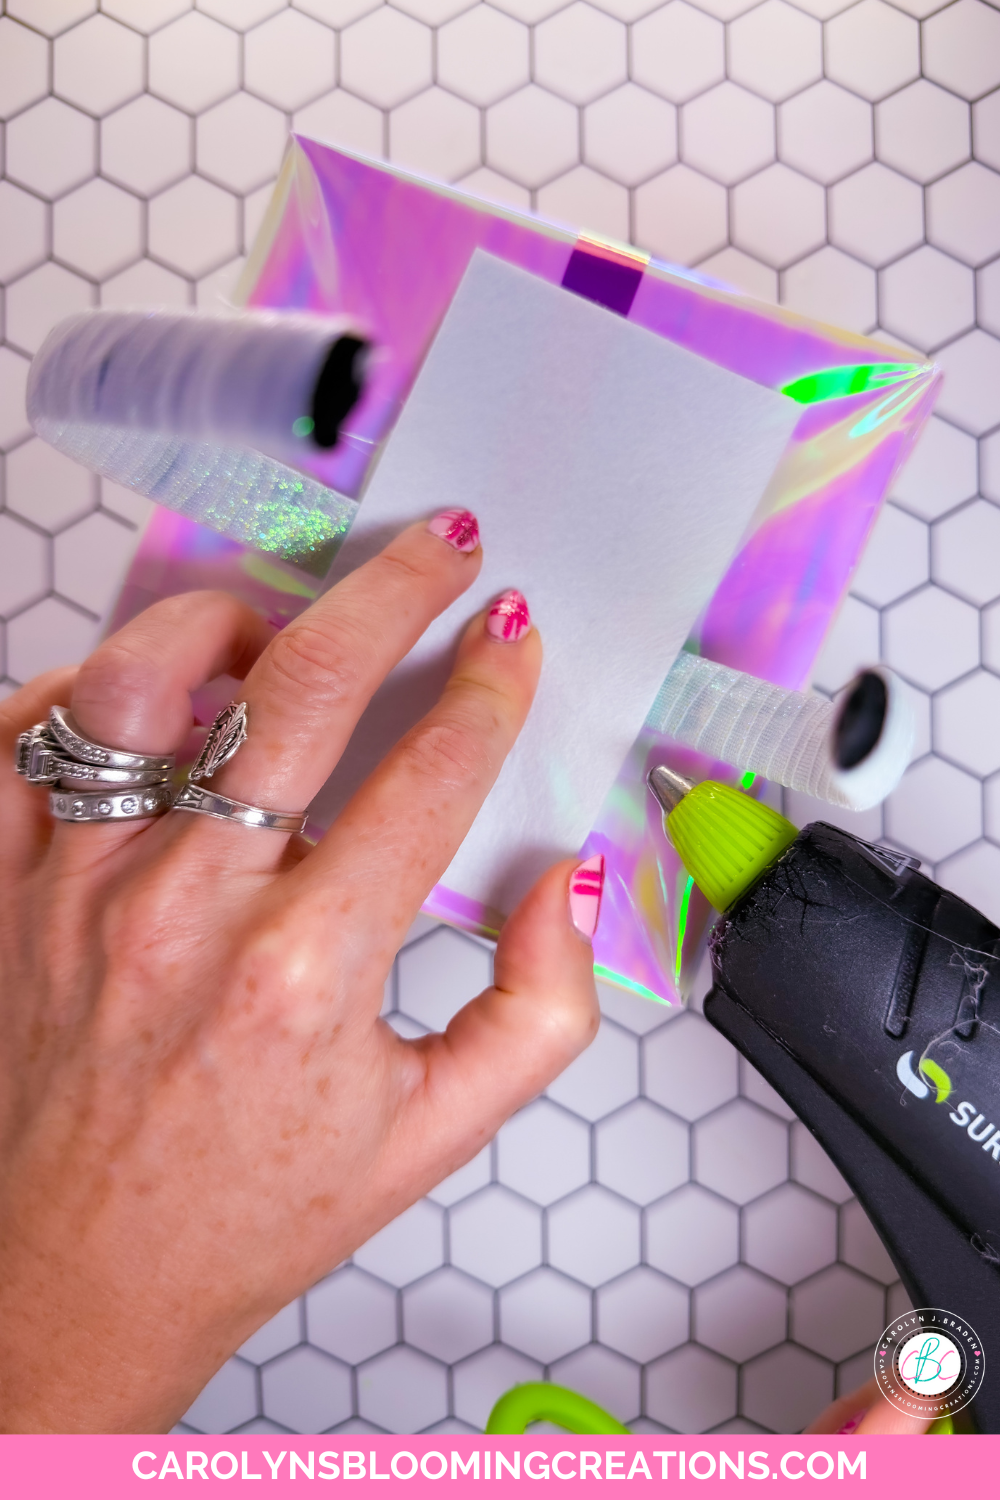
Gluing the felt to the gift box
Step 5: Secure the Present to the Headband
Place the felt square on the headband. I placed the gift box on top of the headband (then I looked in the mirror to see if it looked how I wanted, which was slightly askew) for placement ideas. Hot glue the bottom of the present onto the top of the headband and onto the felt (you are basically sandwiching the headband between the gift and the headband). Hold in place until fully secured.

Gluing on the garland and bow
Step 6: Attach the Bow to the Present
I glued some garland across the top of the gift, tucking the ends under it. Glue the bow to the center or top of your present base. Press firmly and allow it to set.
That’s it—you’re officially gift-wrapped and ready to celebrate!

Happy Birthday Jesus!
Final Thoughts
This DIY present headband proves that the cutest accessories don’t have to be complicated. It’s fun, festive, and guaranteed to spark compliments wherever you wear it. It reminds me of something I’d see a Rockette dancer wearing it while dancing in a winter spectacular show, which you could wear it to dance in too!
My box was lightweight and stays on well, but you could always bobby pin it to your head too if needed. Whether you’re celebrating a birthday or spreading holiday cheer, this headband is a joyful little craft that makes every moment feel extra special.
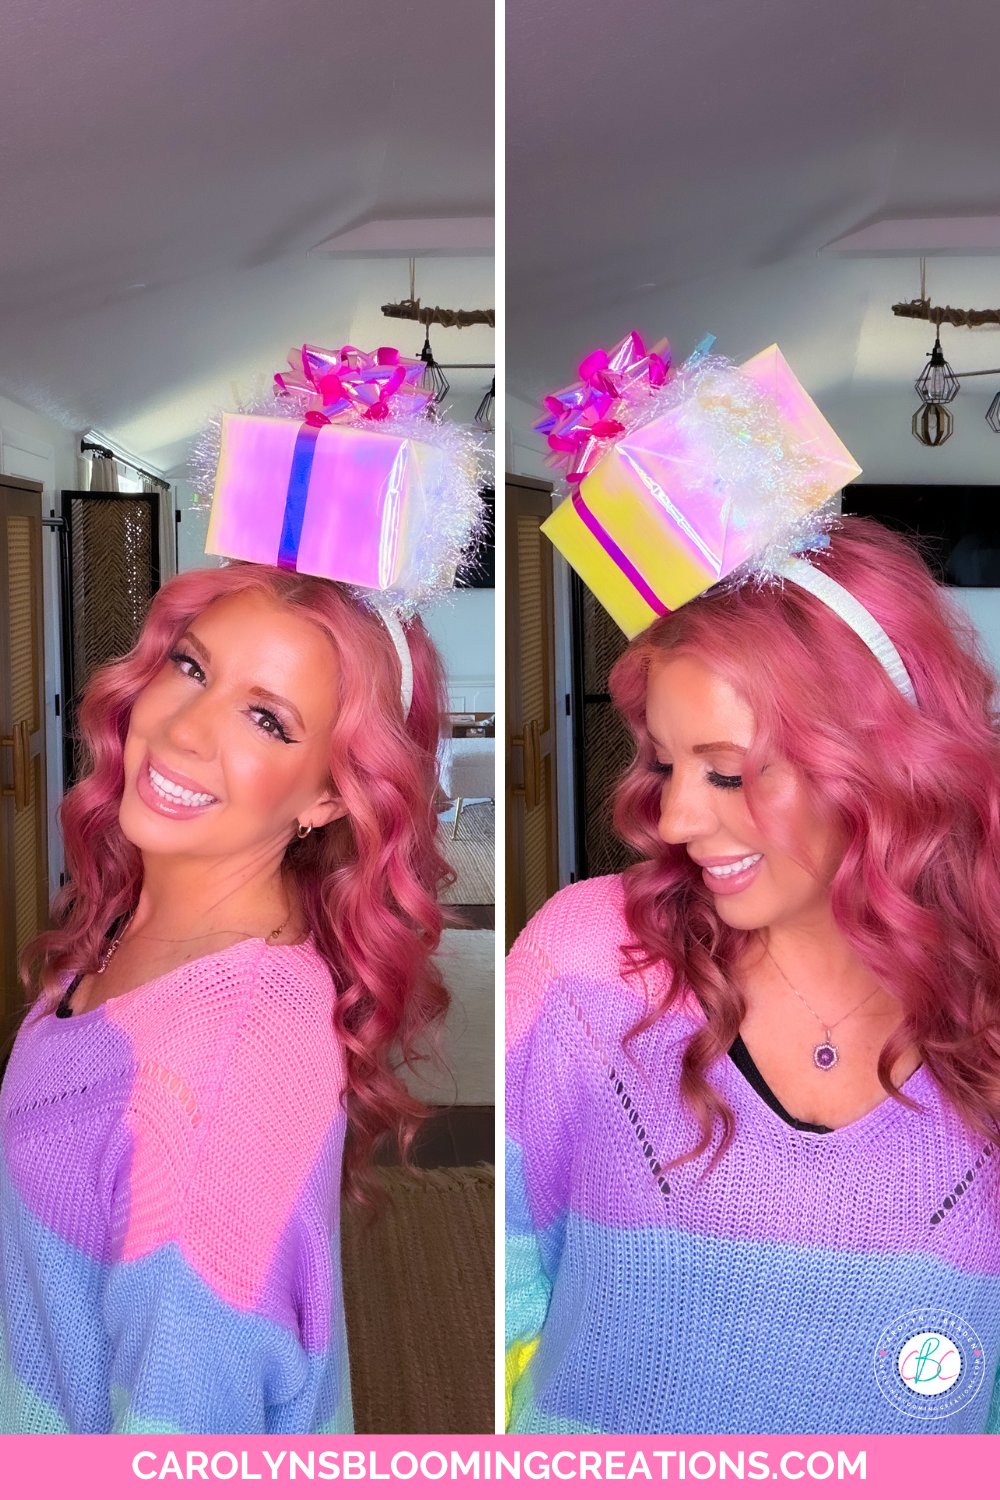
The completed Gift Box headband
Take Action
If you try it, don’t forget to snap a photo—you’re literally the gift 🎁💕 Tag me when you try them because I LOVE seeing your posts💚 If you tag me using @carolynsbloomingcreations or @carolynjbraden, I’ll see it! Or tell me about it in the comments below.
If you loved this article, then we know you’ll love this one too: Make Your Own Sugar Plum Fairy Magic Wand
Carolyn J. Braden is the owner of Carolyn’s Blooming Creations is a regular contributor and editor for CBC. She has been featured in numerous media publications such as InStyle Magazine, on HGTV, on Bustle.com, and more. She is the author of the books Georgia McMasters in Amethyst Lake Cemetery, How To Be Yourself: 3 Ways To Help You Being You, and the illustrator for the children’s book Bridging Connections. She is a former classroom teacher that now dedicates her life to educating others on how to live their most healthy, creative and happy life. Learn more about her visiting our About Us page.