


Carolyn J. Braden • 3 Minute Read

How to Make 4 Ingredient Peanut Butter and Jelly Cups
When I was in college, I worked at a Hallmark store and we sold Russell Stover candy. I fell in love with their peanut butter and jelly cups and looked forward to buying them every once in a while. I always loved chocolate peanut butter cups and the addition of jelly just took my brain down a nostalgic journey of eating my favorite childhood sandwich too.
While the brand no longer manufactures them, I figured out how to make my own and here’s the recipe for my 4-ingredient peanut butter and jelly cups.

Mine are better than the Russell Stover ones because they are super fresh!
My Sweet Inspiration
My daily sweet treat is chocolate peanut butter cups by Justin’s. I love the mini versions (you can eat one or two and be set on sweets for the day!) and order them often from Amazon. I give them as gifts too for my other chocolate peanut butter cup lover friends. When I ran out recently and still had the craving, I turned to my memory of the Peanut Butter and Jelly cups from working at Hallmark in college.

The juicy jelly is divine in my peanut butter and jelly cups!
When I had this Russell Stover Peanut Butter and Jelly cup memory recently and remembered I could no longer find this treat (see their commercial on YouTube from 1999 advertising them here), I decided to make my own.
I’ve had this memory many times over the years, and every time I did, my husband and I went driving around to every Russell Stover outlet and Hallmark store to find them, but they are gone. Other people remember the Russell Stover versions and talk about them on Reddit here.

The completed peanut butter and jelly cups
2025 Reese Peanut Butter and Jelly Cups
I finally got tired of trying to find some and came up with the recipe. As I wrote this recipe up, I stumbled across an article that said Reese was going to hit the markets with their own version of peanut butter and jelly cups in 2025. I guess me and the people at Reese are having the same sweet nostalgic memories! They are going to offer strawberry and grape jelly options and you can read more about them here on the Sporked website.

These peanut butter and jelly cups are easy to make
Why Make My Recipe Instead of Buying Them?
The cool thing about my version of peanut butter and jelly cups are that they are EASY to make and you can tailor them to your own tastes. If you like grape and strawberry jelly, then the Reese version is for you. But, if you want to make some with mixed berry jelly, peach preserves or even go jelly free, my recipe is for you.
We love making Elderberry Mocktails for an immune boost and you can get our quick and easy 1-ingredient recipe below or via our YouTube channel @carolynjbraden. Get your own DEEE-LICIOUS organic elderberry syurp here via The Elderberry Co.
Also, mine are truly delicious and fresh. Sometimes the peanut butter in store bought chocolate peanut butter cups gets dry if they are older. If you make my recipe, you can control the freshness by making them as often as you want. The peanut butter will never be dry because you’ll want to eat them all quickly…they are that good!
The Peanut Butter and Jelly Cup Recipe
Now for the recipe! Here’s what you need. If you buy anything from Temu, use code afe55197 or my link here for 30% off (for new app users). Links below link out to Walmart, Amazon or Temu.
Get a printable PDF and ad-free recipe card by clicking the button below:
Yield: 12 cups
Time: 30 minutes to make, 1 hour to firm up completely
Tools:
12 Cavity Silicone Tart Mold (You can optionally use parchment muffin liners placed in a muffin tin if you don’t have the mold, I got mine here on Temu for about $3, but Amazon has them too)
Small baking tray (I used a small metal one I got at TJ Maxx to place the mold on as mine was very flexible and needed stability)
Ingredients:
6 ounces semi-sweet chocolate (I used Guittard, which comes in a box of 3 two-ounce bars and I used them all for this recipe)
1 Teaspoon Coconut Oil (I used this organic unrefined version from Whole Foods)
12 Teaspoons Natural Peanut Butter (I LOVE Cadia as it’s not too oily and is not sweetened, but you can use a peanut butter that is similar)
6 Teaspoons Jelly (flavor of your choice, I used strawberry and I love St Dalfour as it’s 100% from fruit)

The peanut butter and jelly cups recipe
See me make these in a 1-minute tutorial in my video below or via my YouTube channel @carolynjbraden:
How-To:
Place your mold onto the baking tray and set aside. If using parchment muffin liners and a muffin tin, place 12 muffin liners into your muffin tray and set aside.

Placing the mold on a tray stabilizes it
Place your chocolate in a glass measuring cup with the 1 teaspoon coconut oil and place in the microwave. Melt the chocolate in 30 second increments on 50% power. Stir using a spatula or spoon in between the time increments and keep going until it’s melted and creamy. Do this slowly so you don’t burn the chocolate. You could alternatively use a double boiler method to melt the chocolate.

The melted chocolate
Pour about 1-2 teaspoons of chocolate into each mold cavity. Place in the freezer for 5 minutes or until the chocolate is hardened.
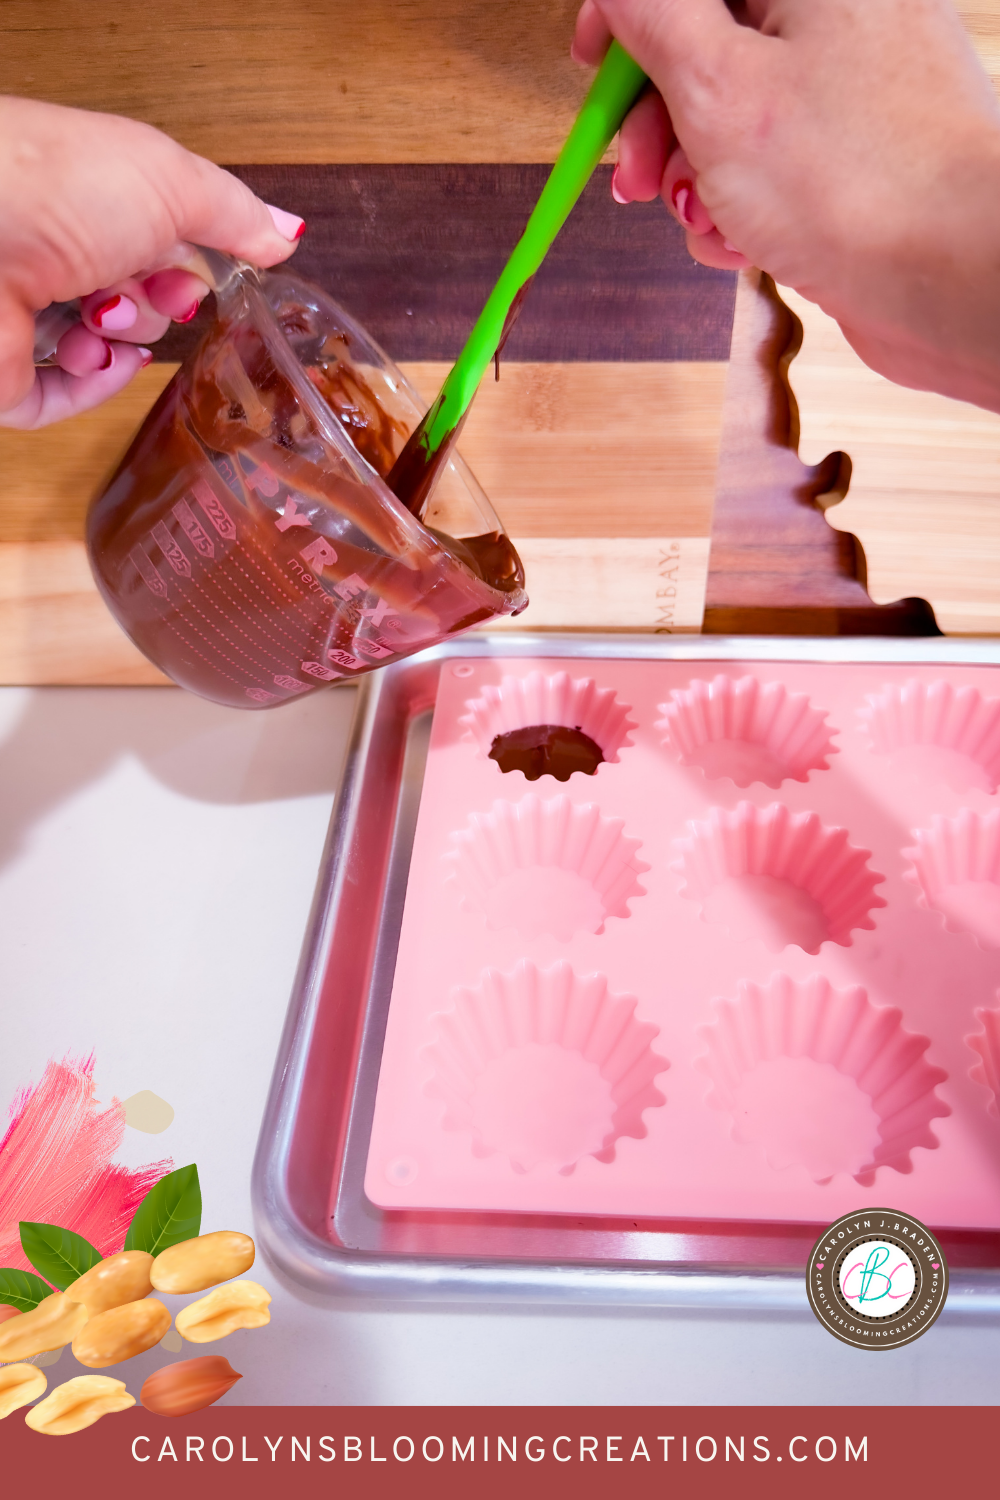
Adding in the first layer of chocolate
Top each chocolate layer with 1 teaspoon peanut butter and smooth as needed. If you don’t want to see the peanut butter layer, keep the peanut butter in the center of the chocolate instead of spreading it out all the way.

Adding in the peanut butter layer
Top the peanut butter with ½ teaspoon jelly.

Adding in the jelly layer, I used strawberry
Pour about a tablespoon or so of the chocolate on top of each peanut butter and jelly layer. I did not worry about them being perfectly smooth….I just made sure each cavity was covered in chocolate until all the chocolate was used up.

These would make a perfect Valentine treat
Freeze for an hour and then you should be able to pop them out of the molds. Or, if you cannot wait, you can freeze for 10 minutes or so and then eat them (the chocolate may be melty, but it will still taste delicious!).
If using muffin liners, I suggested parchment due to the fact that they should cleanly be able to be removed easily from each peanut butter and jelly cup after freezing.

The cups before freezing
I stored mine in a sealed container in the refrigerator to keep them fresh and firm (we live in south Florida and everything melts here…even in the winter sometimes!). We ate through them in about a week, savoring each one daily until they were sadly gone. Then I made another batch and we were happy again!
If you loved this article, then we know you’ll love this one too: Dole Whip and Pineapple Bun Sundaes: DIY State Fair Food
Carolyn J. Braden is the owner of Carolyn’s Blooming Creations is a regular contributor and editor for CBC. She has been featured in numerous media publications such as InStyle Magazine, on HGTV, on Bustle.com, and more. She is the author of the books Georgia McMasters in Amethyst Lake Cemetery, How To Be Yourself: 3 Ways To Help You Being You, and the illustrator for the children’s book Bridging Connections. She is a former classroom teacher that now dedicates her life to educating others on how to live their most healthy, creative and happy life. Learn more about her visiting our About Us page.