


Carolyn J. Braden • 3 Minute Read

How to Make Marshmallow Chocolate Strawberry Bombs
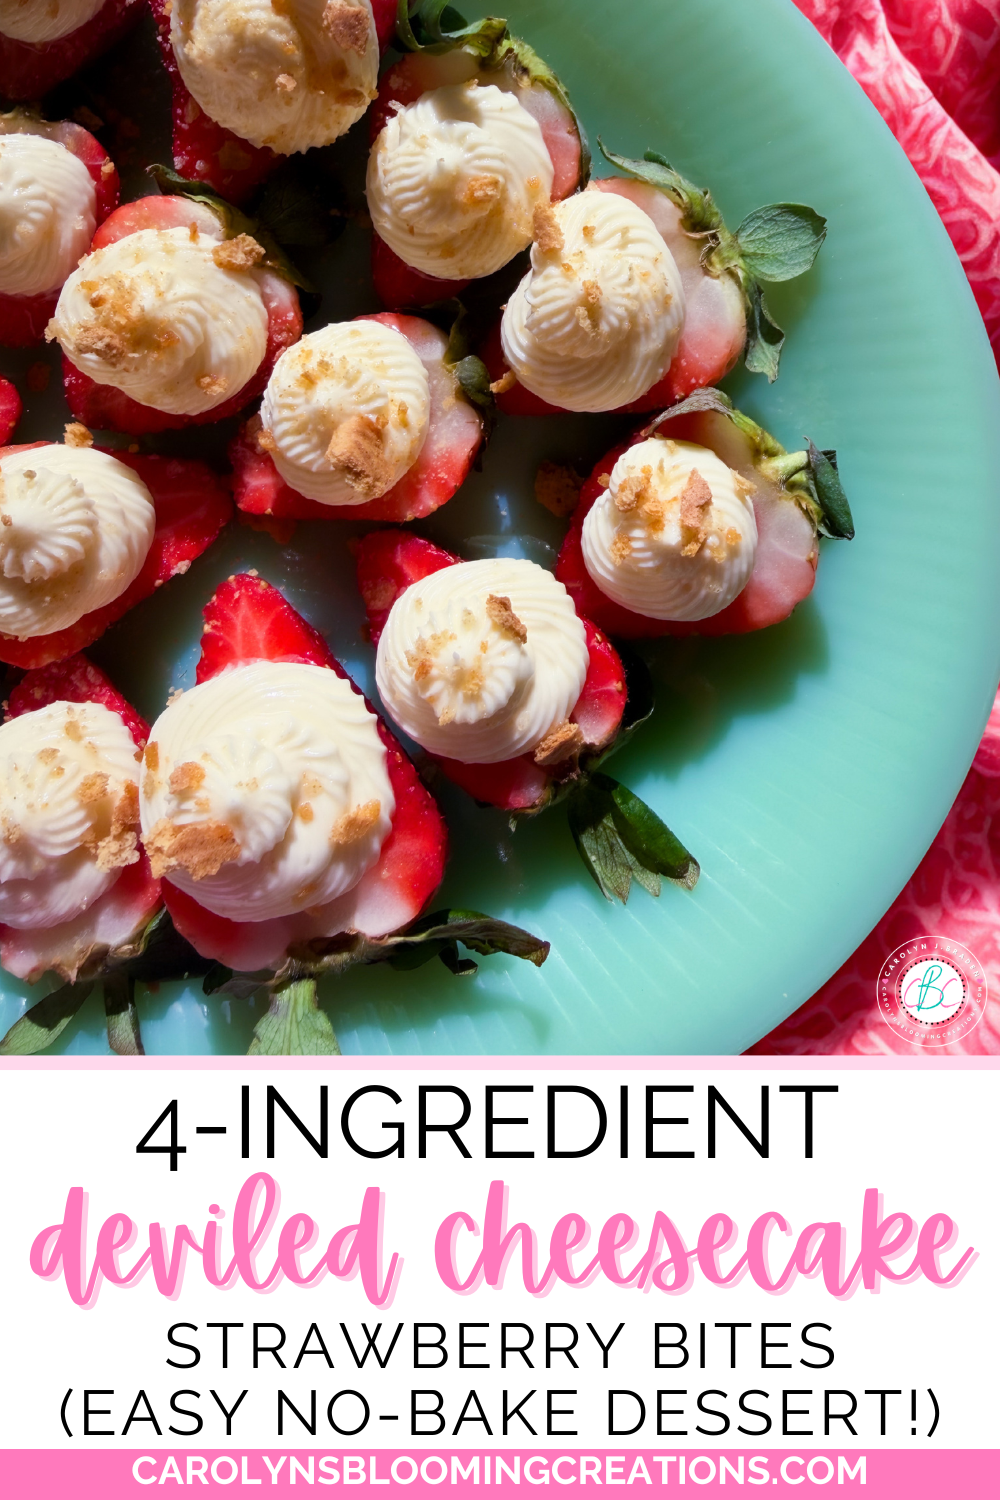
If you are wanting an easy chocolate dessert recipe that comes together in 40 minutes or less, is no-bake, creamy, easy to make, and only created with 4 ingredients, this is the recipe for you! Inspired by my mother-in-law, Mother’s Day, and a friend’s mom, this marshmallow strawberry chocolate bomb is so good and make a perfect special event or Mother’s Day gift idea. Read on to learn how to make them.

The finished dessert: Serving idea in an egg cup
My Sweet Inspiration
My close friend told me his mom loved strawberries. It reminded me of how much my mother-in-law loves strawberries too. Each year on her birthday, I made her a fresh strawberry cake and she loved it and it was a sweet memory to recall. After talking a bit, I also discovered his mom loved strawberries with marshmallow cream and this made my brain start its creative process.
Experimenting and Trouble Shooting
Like I do with all my recipes, I thought of an idea (in this recipe, I thought to take my Chocolate Peanut Butter Crunch Bomb recipe and add new ingredients to the bomb) and then started experimenting. I made my first batch, and did have an issue on a few bombs.
Get my 1-minute tutorial for easy 2 ingredient dark chocolate cherry bark in my video below or via my Youtube channel @carolynjbraden:
If I didn’t spread the chocolate to the top of each bomb mold and overfilled them slightly, the chocolate bottom did not attach as well, causing oozy bombs. This does not affect the taste, however, some of the strawberry juices and marshmallow may ooze out the bottoms a bit if you encounter this too.
The other issue is that if you get really juicy strawberries, their juice will make the marshmallow inside very liquid-like. My husband discovered this when biting into one of the bombs (one that had sat overnight and gave the strawberries a chance to mix with the crème) and it oozed out all over his chin. For this reason, if you are not eating these right away, warn the person to use a plate and a fork to eat one.

You could make these with just marshmallow cream
Why Homemade Can Be Better
In trying to cut back my sugar intake over the past year, I made mine without any added sugars so you can feel a little less guilty when you indulge in one. Less sugar does not mean less taste. I love using quality ingredients as I did with these, and I did not miss the sugar at all!
Many store-bought items have many hidden sugars and when making things homemade, you are in control of what you are consuming. Thoughtfully choose ingredients that are right for your body and you can enjoy desserts on occasion without guilt.
How Can I Alter this Recipe?
No, you do not have to add the strawberries. You can make these bombs with marshmallow cream only or you can make the bombs with fresh strawberries only. Then it would taste like a chocolate covered strawberry! Like many recipes, I play around with flavors a lot, so I know you can too.
If you can’t eat strawberries because of the seeds (so many people have issues with the diverticula, and this helpful article via the International Foundation for Gastrointestinal Disorders website can give you more information on this), add another fresh fruit like cubed mango, orange slices, and possibly non-pollinated pineapple.

You can use strawberries or another fruit
The Marshmallow Chocolate Strawberry Bombs Recipe
Now for the recipe! Here’s what you need. Links below link out to Walmart, Amazon or Temu.
Yield: 10 -12 bombs
Time: 40 minutes to make
Tools:
Two 6 or one 12 Cavity Silicone Mold (The rounded molds I used are from Target and Amazon…sometimes the shape is called a “fat bomb” mold. You can optionally use parchment muffin liners placed in a muffin tin if you don’t have the mold which will give you more of a traditional peanut butter cup shape or you can use another shaped mold if you have one)
Small baking tray (I used a small metal one I got at TJ Maxx to place the mold on as one of my molds was very flexible and needed stability)
Tweezers if using the gold leafing
Ingredients:
6 ounces semi-sweet chocolate (I used Guittard, which comes in a box of 3 two-ounce bars and I used them all for this recipe)
1 Teaspoon Coconut Oil (I used this organic unrefined version from Whole Foods)
Chopped Fresh Strawberries (Walmart or any grocery store), I used about 5-6 total
10-12 Teaspoons Marshmallow Cream (I got mine at Whole Foods/Amazon and my 6.3 oz jar was plenty)
Optional: White food coloring (Amazon) and a food-safe paint brush

I bought my strawberries at a Florida farmer’s market
Note: If your strawberries are fresh and ripe like mine were (I got mine at a local farmer’s market), eat these within a few days of consuming. I stored mine in a sealed container in the refrigerator for about 6 days and they were still delicious.
Get a printable recipe card by clicking the button below!
Check out my 1-minute video tutorial on my TikTok now or below on my YouTube channel @carolyjbraden!
How-To:
Place your mold onto the baking tray and set aside. If using parchment muffin liners and a muffin tin, place 10 muffin liners into your muffin tray and set aside.

I love a good chocolate!
Place your chocolate in a glass measuring cup with the 1 teaspoon coconut oil and place in the microwave. Melt the chocolate in 30 second increments on 50% power. Stir using a spatula or spoon in between the time increments and keep going until it’s melted and creamy. Do this slowly so you don’t burn the chocolate. You could alternatively use a double boiler method to melt the chocolate.

The coconut oil helps the chocolate pour and mold more easily
Pour about 1/2 tablespoon of chocolate into 10 mold cavities. Lift the tray up and move the tray around to “swirl” the chocolate around in the cavity to coat it COMPLETELY…all the way to the top.

Pouring chocolate into the molds
Read my section titled “Experimenting and Trouble Shooting” in my full recipe article for more tips on making these perfectly. Place in the freezer for 10 minutes or until the chocolate is hardened.

Swirling the chocolate
Next, top each chocolate layer with 1 teaspoon of marshmallow cream and smooth down with a small spatula.

Adding the marshmallow cream
Add in a few chunks of strawberries, pushing them into the marshmallow cream. If this filling combination protrudes out the top of the bomb, remove some as it won’t seal properly in the next steps.

Adding the fresh strawberries
I heated my chocolate a bit longer when I got to this point to make sure it was still very “melty”. Pour about a tablespoon or so of the chocolate on top of each marshmallow/strawberry filling, using up the rest of the chocolate.

Topping off each bomb
I did not worry about them being perfectly smooth….I just made sure each cavity was covered in chocolate until all the chocolate was used up. I tapped the tray on the counter to settle the chocolate, which made them all flatten and smooth.
Freeze for 10-15 minutes more and then you should be able to pop them out of the molds.
If using muffin liners, I suggested parchment due to the fact that they should cleanly be able to be removed from each bomb after freezing.

Splatter painting the bombs
I placed some white food coloring in a bowl and a brush and my fingers to “splatter paint” some on the top of each bomb. You don’t have to do this…it just makes them look a bit fancier. It will dry completely within a few hours and/or after refrigerating.

They are gooey and delicious
I stored mine in a sealed container in the refrigerator to keep them fresh and firm (we live in south Florida and everything melts here…even in the winter sometimes!). We tested them and they were exactly how I imagined…delicious! As I stated earlier, they can get oozy after a day, so then I’d eat them on a plate with a fork or spoon.
If you tried these, leave us a comment below or share you own favorite dessert idea!
If you loved this article, we know you’ll love this one too: How to Make Butterfly Soft Pretzels
Carolyn J. Braden is the owner of Carolyn’s Blooming Creations is a regular contributor and editor for CBC. She has been featured in numerous media publications such as InStyle Magazine, on HGTV, on Bustle.com, and more. She is the author of the books Georgia McMasters in Amethyst Lake Cemetery, How To Be Yourself: 3 Ways To Help You Being You, and the illustrator for the children’s book Bridging Connections. She is a former classroom teacher that now dedicates her life to educating others on how to live their most healthy, creative and happy life. Learn more about her visiting our About Us page.