


Carolyn J. Braden • 3 Minute Read

Party Outfits You Can Dance In (and are Budget Friendly!)
Article originally posted: 12/13/24
Article updated to include no-sew wide leg pants: 12/17/24
I used to host many parties at my home. I really need to get back to doing it because they were a lot of fun. When I planned my parties, I always planned my outfit around it because I wanted to make sure I could easily dance. I’ve always loved dancing at my parties, but I love being comfortable too. Here are some of my ideas for party outfits you can dance in and are budget friendly too!
Uncomfortable = Becoming a Grinch
Comfort doesn’t mean you have to sacrifice style. When you are going to a holiday event, a party or a wedding (there always seems to be dancing at weddings), it’s a good idea to think about how you will feel after standing in heels or sitting in a tight outfit all night. When my feet hurt or my outfit is uncomfortable, I can get grouchy like the Grinch, which steals my joy while being at the event.

My easy festive outfit idea
We Need Style + Comfort
In 2024, I received a pair of Naturalizer ballet flats complimentary from the brand to test (see them featured in my faux Faberge egg tutorial here on my website). I always thought the brand was too mature for me, but as I browsed their website (in doing research on the brand) I saw some styles that were quite cute. This makes me hopeful that more brands will start to understand that people want style and comfort!
Sacrificing Comfort is Not My Jam
I honestly don’t care about brands as much as I care about comfort. I also think about affordability. If a pair of shoes are $800+ and are super cute, they won’t come home with me if they are not comfortable. I even sold a pair of shoes I absolutely loved.
Because they hurt my feet so bad (they looked like ballerina shoes with tulle and pink satin), I let them go. Maybe other women have a higher tolerance to foot pain than I, but after being on my feet for many years as a teacher (I never sat down!), I had to give up shoes that hurt.

The softest sweatshirt ever!
If I ever wear shoes that hurt my feet unintentionally, I love to use Lush’s Peppermint Foot Lotion on my feet to ease my pain. It has arnica in it, which is a natural remedy for brusing, swelling, and other minor pains.
If Lush’s products don’t fit in your budget, Boiron has a foot cream with arnica in it that works well too. I always take their Arnicare Tablets when I bump my body and just KNOW a bruise will occur. It always shortens the lifespan and intensity of my bruises.
My Comfy Party Outfit Ideas + Discount
Here are some of my favorite holiday outfits. Many pieces came from Temu. If you want to try to shop Temu, use my code afe55197 or use my direct link here for 30% off (for new app users only).

My Cut a Hemline Wide Leg Pants
There is nothing fun about dancing in pants that are too long. If you like style and comfort but don’t want to trip, try these no-sew pants from Temu.

The pant length was perfect after I cut the raw hem
They have a raw hem, which means they can be cut to fit without needing to sew the edge…no sewing is needed! All I did was place them on a table, measured them out to the length I needed them and cut them with my fabric scissors. If you are unsure of your cutting skills, cut them to be too long the first round as it’s easier to cut more off than it is to add length back.

I love the studded jean jacket with these pants
I paired the pants with a v-neck shirt I got on Temu for around $8, a pearl and rhinestone studded jacket I got on Amazon (I LOVE IT!) and a pair of Reebok Classic Harman sneakers (Amazon). It’s easy, comfy and you can definitely MOVE in this outfit! It’s a great kids birthday party outfit, casual dinner party outfit, or anytime, really. They are a polyester blend and thick enough to wear for winter, but would be great for any season.
Get the video tutorial for how I trimmed my pants in my one-minute video above or via my YouTube channel @carolynjbraden.

My New Year’s Eve Comfy Outfit
Black and Gold Dress, $10, Temu
For this outfit, I styled it with some chunky heeled boots (thicker heels are always more comfortable to me), Spanx moto leggings and a New Year’s Eve tiara ($10, Amazon). I also wore it as a dress and you can see my cute gold and black dress styling (very party appropriate and dance-friendly) in my 1-minute video below or via my YouTube channel @carolynjbraden:

A very simple and easy LBD (Little Black Dress)
Black Bell Sleeve Dress
I can’t seem to find it on Temu anymore, but here is a similar one on Amazon). I’ve worn this black bell sleeve dress all throughout 2024. It’s easy, cute, simple and inexpensive at around $10! I paired it with some chunky black and silver heels to match my cute wintery snowflake DIY glitter hairstyle (see the hairstyle and many other party-friendly hairstyle tutorials here).

I love this wrap plaid dress!
Red Plaid Wrap Dress, $15 Temu
I adore this wrap dress. It’s lightweight and I can move very freely in it. I paired it with nude fishnet tights and Sam Edleman gold platforms, which would be comfortable for a little while.
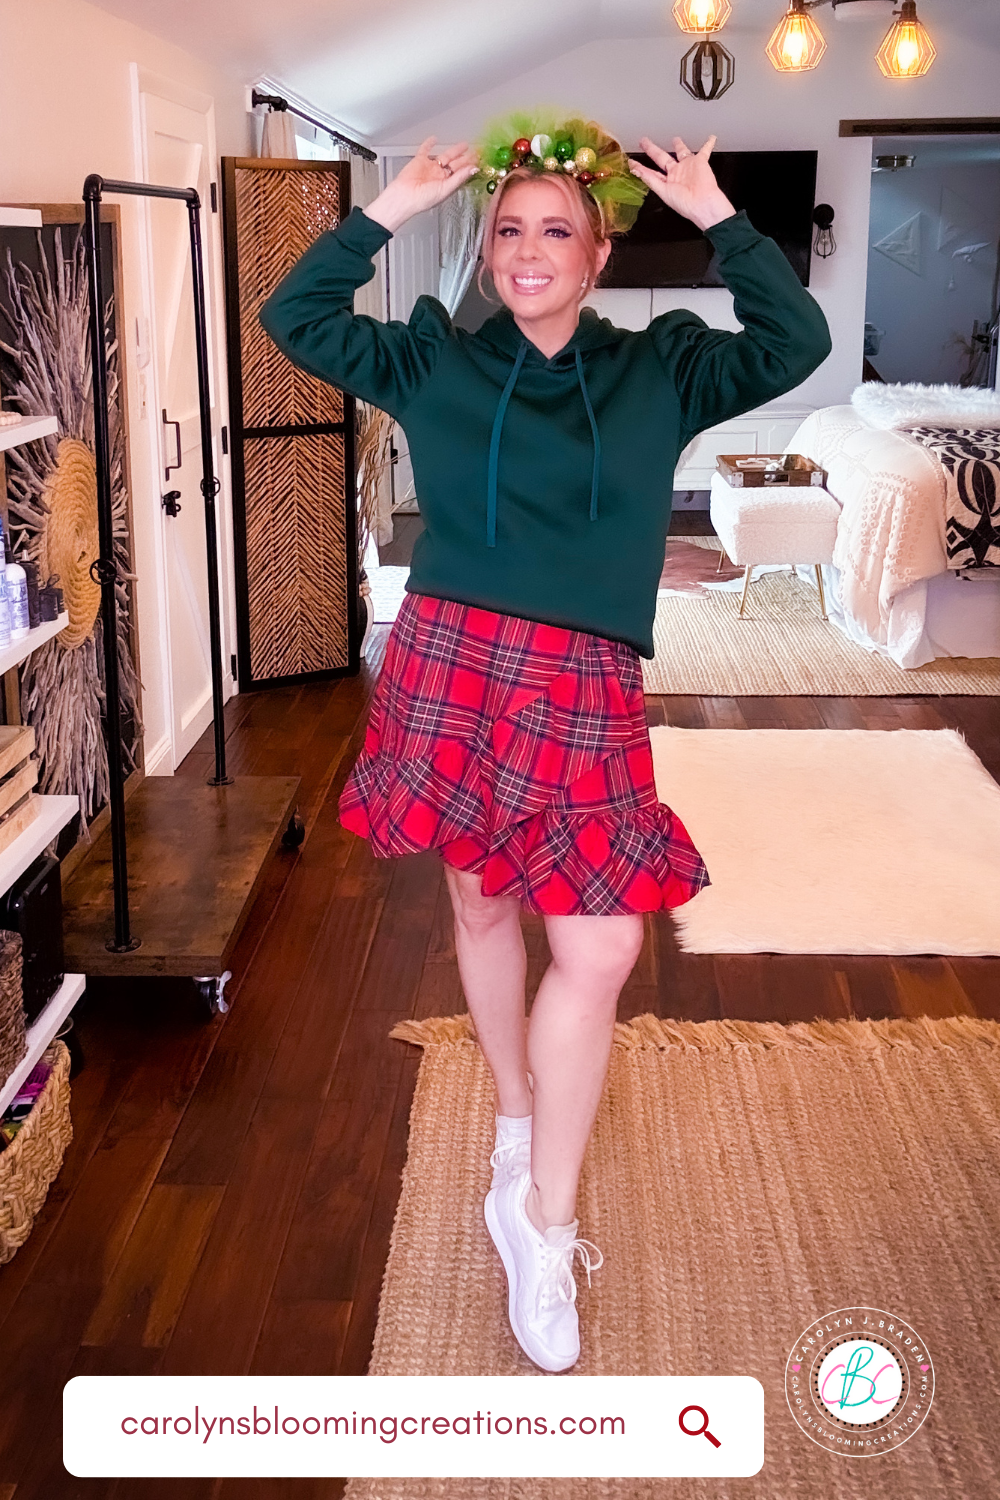
A casual way to wear the plain wrap dress
For the dancing part of the night, I’d remove my heels and tights, add some white Classic Harman Reeboks, a hunter green puffy sleeve hoodie ($10, Temu) and add a ornament tiara (I got it on Temu and added the green tulle to it myself).

The most comfy and cute holiday outfit
Merry and Bright Sweatshirt, $11, Temu
This sweatshirt is the softest I’ve ever worn! I paired it with the Spanx moto leggings and the Reebok shoes and a cute little hairstyle with these clip in Christmas bulbs (I got them on Temu, but Amazon has them too) for a comfy cold weather style.

My warm weather holiday attire
If you are in a hotter climate for the holidays (like I currently am in Southwest Florida), you can pair it with cut off jean shorts and some silver cowgirl boots (I got mine on Temu, but Amazon has similar ones and Walmart has some for $10!) for a “cowgirl Christmas” style. It’s cute, festive and you can go line dancing in this outfit!
See the look come together in my 1-minute video below or via my YouTube channel @carolynjbraden:
If you loved this article, then we know you’ll love this one too: How to Make a Personalized Disco Cowgirl Ornament
Carolyn J. Braden is the owner of Carolyn’s Blooming Creations is a regular contributor and editor for CBC. She has been featured in numerous media publications such as InStyle Magazine, on HGTV, on Bustle.com, and more. She is the author of the books Georgia McMasters in Amethyst Lake Cemetery, How To Be Yourself: 3 Ways To Help You Being You, and the illustrator for the children’s book Bridging Connections. She is a former classroom teacher that now dedicates her life to educating others on how to live their most healthy, creative and happy life. Learn more about her visiting our About Us page.