


Carolyn J. Braden • 3 Minute Read
Easy Alcohol Ink and Air-Dry Clay Seashell Bowls DIY Gift Tutorial
If you’re searching for a unique, budget-friendly handmade gift, these easy alcohol ink and air-dry clay seashell bowls are the perfect DIY. They’re colorful, coastal-inspired, and look like something you’d find in a boutique—but they’re surprisingly simple to make at home.
This project is beginner-friendly and doesn’t require any special tools, making it ideal for anyone who loves DIY home decor, handmade gifts, or creative crafts.
Shop the Post
Support me as a creator and shop my links with no extra cost to you! See my creation come together via my Amazon Shop plus get buying links at affordable prices!
We also love shopping CVS (the ExtraCare card savings stack helping you to save!) and here are some of our CVS finds to stock up on (especially when you get that 40% off coupon!) and love Walmart (Walmart+ gets you free shipping and delivery on many items)!
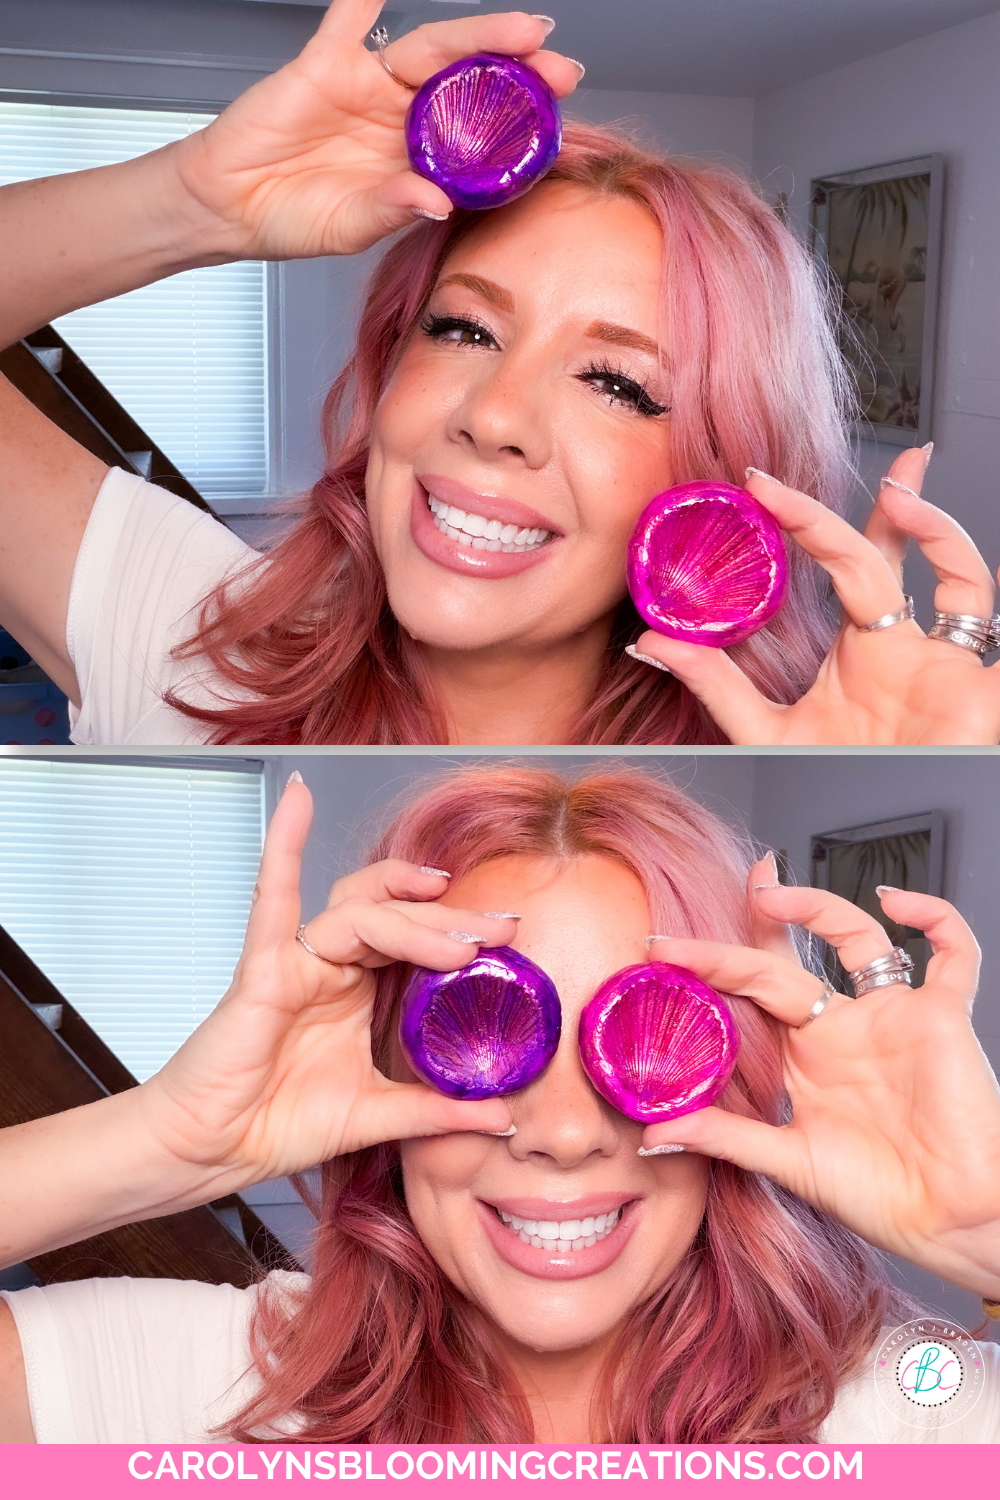
The most colorful seashell bowls!
More Product Loves
You can also get the products I’ve featured and more of my product loves via my Target shop here or my CVS Store here (use your ExtraCare card to double up on savings!) or via my shop my store here or below:
Bookmark or pin this one by clicking the Pinterest SAVE button on the images in this article for crafty magic in an instant.
Why You’ll Love These DIY Seashell Bowls
These bowls are more than just pretty—they’re practical and customizable too:
Easy for beginners
No kiln or baking required (perfect for teachers that have clay in their mandatory curriculum like I did but have no access to a kiln…this was ME for years until I finally found a church that gave me 2 kilns for my school!)
Each piece turns out completely unique
Affordable to make in batches for gifting
Perfect for a coastal or beach-inspired aesthetic

DIY Seashell Bowls with Alcohol Ink – Easy Coastal Craft You’ll Love
Pro Tips for the Best Results
Always wear gloves—alcohol ink stains fast
Work in a well-ventilated area
Start with small amounts of ink and build color gradually
Use paper towels or brushes to soften or blend areas
Let everything dry fully before sealing
Creative Ways to Use Your DIY Seashell Bowls
These handmade bowls are as functional as they are beautiful (FYI, my version is not food safe so these ideas are for other uses):
Jewelry holder for rings, earrings, and necklaces
Key dish for your entryway
Bathroom decor for soaps or small items
Coastal shelf or coffee table styling piece
Candle or crystal holder
Desk accessory for paperclips or small essentials
Check out more of my alcohol ink projects below or via my YouTube channel @carolynjbraden:
Why These Make the Perfect DIY Gift
These seashell bowls check all the boxes for a thoughtful gift:
Handmade and one-of-a-kind
Easy to personalize with color choices
Lightweight and easy to package
Perfect for any occasion

I just love to see all these colors!
They’re great for:
Birthdays
Mother’s Day (oh, how my kindergarteners loved making pinch pots for Mother’s Day gifts when I taught art and these are very similar!)
Bridal showers
Hostess gifts
Holidays
Pair one with a small gift (like jewelry or a candle) for an even more special presentation.
Check out my 1-minute video tutorial for this project on my TikTok now or coming soon here and to my YouTube channel @carolynjbraden!

They make me smile to look at them….love the rainbow colors
Supplies You’ll Need
Links go out to either the brand website, Amazon, CVS, Walmart, Sam’s Club, Target, or Lowe’s where we source our supplies based on discounts, budget and pricing.
Alcohol inks (mine are from Amazon)
Disposable gloves (trust me—you’ll want these!)
Aleene's Acrylic Spray Gloss Finish (not food safe, so do not use these bowls for any edible items, see this article for food safe sealant choices)
Dropcloth or a garbage bag
Bowl for water
Seashells (I used small 2-inch scallop shells I found, or you can buy them from Amazon)
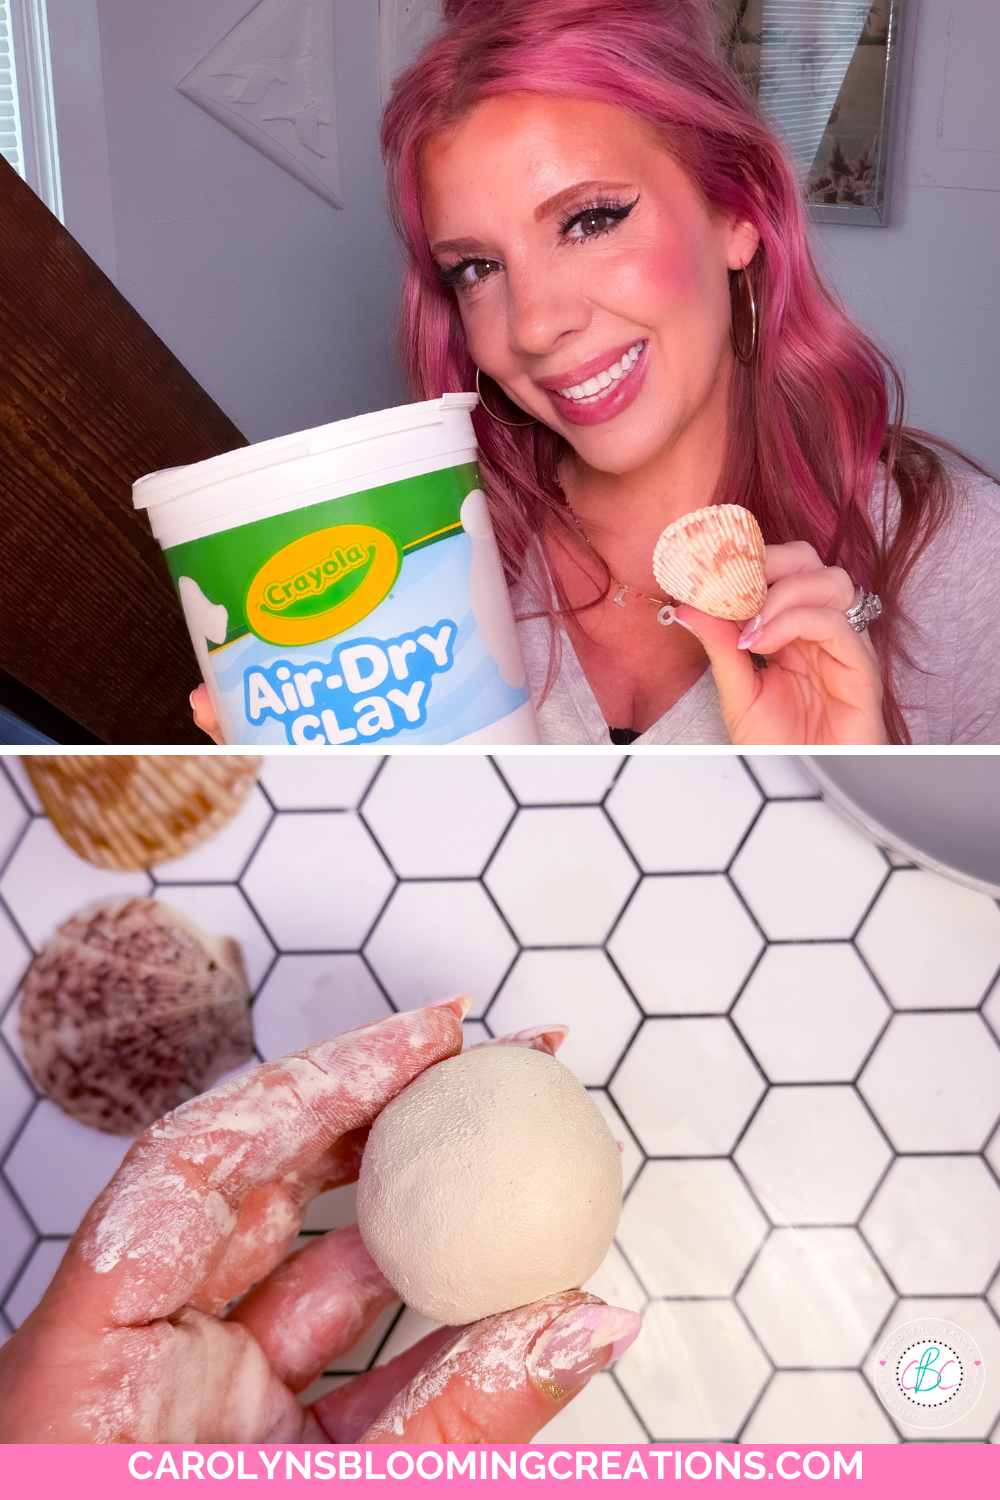
Roll the clay into a ball
How to Make Alcohol Ink Seashell Bowls
Step 1: Prep Your Workspace
For clay, you’ll need to work on a non-stick surface like a plastic cutting board. Lay a piece of plastic wrap down on it.

Cover and press the shell in…the plastic prevents sticking
Step 2: Shape Your Clay
Take a small portion of air-dry clay (maybe a 3 inch chunk, adjust according to your seashell size, smaller 2-3 inch shells work best), roll it into a ball and place it onto the plastic wrap. Lay some more plastic wrap on top of the ball, press your seashell into the ball, gently pressing down to form the bowl shape. Gently smooth out any rough edges with your fingers and some water.
Carefully remove the plastic wrap off the clay bowl and place it on a cooling rack covered with wax paper.

Fully air dry
Step 3: Let It Dry + Pre-Seal
Allow your clay bowl to dry completely. This usually takes about 24–48 hours depending on thickness and humidity. I removed mine off the wax paper and placed them onto a cooling rack once they were mostly dry to ensure better air flow under the bowls. I set them on my porch in the sun to help speed up the drying a bit.

Seal before you add the inks
Place back onto the wax paper (I also placed them on the wax paper and a piece of cardboard) and go outside for proper ventilation. Spray your bowl with Aleene's Acrylic Spray Gloss Finish to make the alcohol ink adhere. Simply putting the inks on the clay alone will soak up the inks, making the finish less colorful and they won’t blend properly.

Add the inks with brushes or by dropping
Step 4: Add Alcohol Ink
Once your bowl is fully dry, it’s time for the fun part.
Lay down a drop cloth or garbage bag to protect your surface—alcohol ink can get messy (and stain!).

I love the pink ones!
Put on your disposable gloves before handling the ink.
Drop alcohol ink onto the surface and let the colors naturally spread and blend. I used a paint brush to get full covereage over the natural lumps and bumps of the clay. You can layer colors or dab with paper towels to create texture and movement.
No two bowls will ever look the same—that’s the beauty of it. I added gold ink and some swipes of a different color to add depth and make details pop.

I added some stripes with other colors and the gold for more texture
Step 5: Seal for a Glossy Finish
After the ink is completely dry, spray your bowl with Aleene's Acrylic Spray Gloss Finish to seal again and protect your design.
This step gives your bowl that polished, high-end shine.

They sparkle in the sun!
Final Thoughts
These easy alcohol ink and air-dry clay seashell bowls are proof that you don’t need expensive supplies to create something truly beautiful. With just a few materials and a little creativity, you can make stunning pieces that look store-bought—but feel much more meaningful.
Once you start, you might not want to stop—these are seriously addictive to make.
Take Action
If you try any of my ideas, let me know how it turned out—or tag me when you try them because I LOVE seeing your posts💚 If you tag me using @carolynsbloomingcreations or @carolynjbraden, I’ll see it! Or tell me about it in the comments below.
If you loved this article, we know you’ll love this one too: DIY Leather Shoe Makeover: GLOW UP Your Old Shoes
Carolyn J. Braden is the owner of Carolyn’s Blooming Creations is a regular contributor and editor for CBC. She has been featured in numerous media publications such as InStyle Magazine, on HGTV, on Bustle.com, and more. She is the author of the books Georgia McMasters in Amethyst Lake Cemetery, How To Be Yourself: 3 Ways To Help You Being You, and the illustrator for the children’s book Bridging Connections. She is a former classroom teacher that now dedicates her life to educating others on how to live their most healthy, creative and happy life. Learn more about her visiting our About Us page.