


Carolyn J. Braden • 4 Minute Read

How to Make Henna Designs at Home
Article Published: 12/31/24
Article Updated with a Snake Design and a Sun Design: 4/2/25
Little did I know that doing research on henna designs and henna history for my at-home henna tutorial would lead me down such a long-tunneled rabbit hole. I read so many henna tutorials, watched henna videos and learned about at-home henna artists and more. With every person having their own henna methods and opinions on what to do and what not to do, I had to try it and see what worked for me. Read on to learn how to make henna skin designs at home.

My first henna design
Henna Dye History
If you have never heard of henna, it’s a reddish dye that is used to dye hair, skin and more. I’ve used natural indigo plant to dye fabric in college, and henna is a very similar type of a dye as it’s from the henna tree. When I used indigo, we boiled the leaves (in my fiber arts class) and got a rich blue dye. Henna dye is made from dried henna tree leaves that is turned into a powder and mixed with water or other liquids to form a paste. Read more about the process of making henna here on Wikipedia.
How Henna is Used
Henna has a lot of cultural ties to Pakistan, India, Africa and the Middle East. It has been known to help headaches, belly aches and more. Most notably, henna has been turned into a paste and applied onto the skin in a variety of designs to symbolize good health and prosperity. In my research I found that many brides will have a henna artist come to their home to apply henna to their skin before their wedding day.
Speaking of wedding day, I created a “something blue” flower comb that would be a perfect addition to your wedding and it’s easy to make. Get the 1-minute tutorial below or via my YouTube channel @carolynjbraden:
Is Henna a Tattoo? + How Long Henna Lasts
A henna design is not a tattoo, although many people will call it this. A tattoo is permanent while henna is not. A tattoo is made with ink that is applied into your skin via a needle. Henna is much less painful and it is temporary. Henna can last on your skin a few days to a few weeks, depending on how well you care for it. If you want or need it removed from your skin quicker, you can follow this guide on the US Dermatology Partners site.
Henna Dye for Hair
You can use henna paste to dye your hair, but in my research, you cannot go right back to regular dyes with henna in your hair. If you are going to use henna to dye your hair, it needs to be well researched and you must make sure you are going to stick with it for a while or not be in a hurry to get salon highlights or be dyed with regular hair dyes. See some of the henna dye for hair pros and cons here.
The Zenia Henna cones are easy to use
My Henna Design Test + Tutorial
There is much, much, much more you can say about henna, and I’m still learning. If you want to try to do a henna design on your skin at home, it’s pretty quick and easy. I reached out the people at Zenia to see if they’d send me some pre-made henna cones to try and they did. I have not used any other henna brands at this time, so I can only speak to my experience with Zenia.
The Zenia pre-made henna cones are a very inexpensive way to try henna designs at home.
The pre-made henna cones have expiration dates and I read one person’s review that said they put theirs in the freezer to get around the expiration date. I haven’t tried this, but it could be an option if you buy a lot of cones and don’t have the time to use them.
SENSITIVE SKIN WARNING
IF you have sensitive skin, do a patch test before using henna! I saw some people have allergic reactions to henna skin designs, so this is important to note.
What You Need For At-Home Henna Designs
Get Zenia Henna at the following retailers (you can use it for hair or skin):
Zenia Pre-made henna cones, 6 Pack, $9.99, Amazon
Zenia Henna Powder, $7.99, Walmart
Zenia Pre-made henna cone, 1 pack, $6.25, Amazon
Optional:
¼ lemon wedge squeezed into a small spray bottle of water for spritzing your henna paste design (I researched this and many henna artists swear by this or lemon + sugar water) to help you achieve darker, more vibrant henna stains.
Toilet Paper + medical/surgical tape (I researched this too and many henna artists swore by doing henna a couple of hours before bed, then spraying with the lemon water and wrapping the design in toilet paper to protect the design while sleeping…this is what I did)
Cotton Swabs or tiny detail brushes (for cleaning up messes or creating more elaborate designs)
My Heart Henna Design
I wrote this article and did my henna design on the last week of December in 2024, which was a very difficult year for me, and many in my circle. I added hearts to my design because I want to continue to have LOVE be a big part of my life in 2025. LOVE is one of the only things that has helped me push forward in 2024 and I know the theme of LOVE will be a great thing to carry on into 2025.

Me, wearing my first henna design (day one)
I added 9 hearts, as the number 9 represents completion, wisdom and spiritual growth. Oh how this period of my life has been so filled with growth. I liked the lines because they sort of represent the ties that bind me to all of the people, animals and things I love. The dots were just for fun. Like any design you will live with on your skin for a while, I think it’s a good idea to make sure it is something that has meaning for you.
See my 1-minute video tutorial below or via my YouTube channel @carolynjbraden:
How-To:
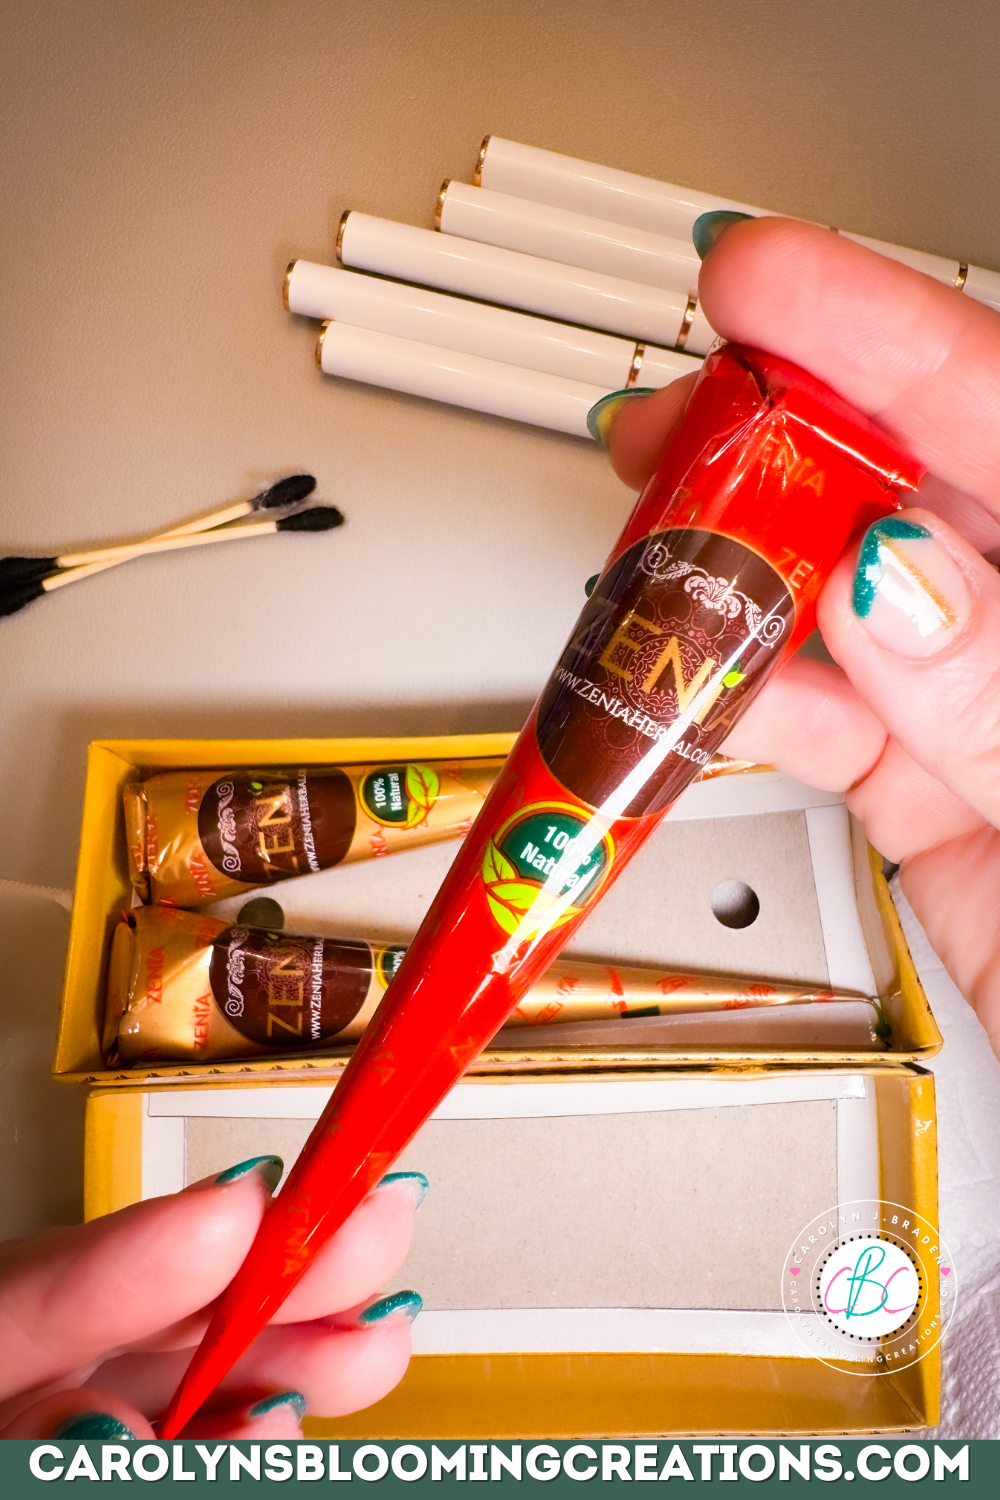
I pulled the pin from the henna cone. Zenia sent me a pack of three cones, all are the reddish-brown color most know henna to be. Tug on the pin if it’s tight….it will come out! You can replace the pin when you are done so you can use the rest of what’s in the cone.

Removing the pin from the henna cone
I practiced some lines and designs on wax paper before trying it on my skin. I would say that the henna paste comes out of the tube-like icing. I’ve made tons of cakes over the years and if you’ve ever used an icing bag to add designs to a cake, this is similar. If you’ve never done henna before, you can also put some lotion in a piping bag, cut off the tip a tiny bit and practice on your skin.

Practicing with henna paste
When I felt confident in my piping skills, I had a design in mind and got right to work. I researched some easy designs on Pinterest so I knew what I wanted to start with. I piped some lines on my fingers first.

Starting my henna design
Next, I added some lines around my wrist, connecting them to the line I put on one of my fingers.

My henna lines
Next I piped on some hearts and some dots and let it dry. I could see that some of my henna didn’t stick to my hand well, so I re-piped over some lines and hearts to put a little pressure on it to lay flatter. I also noticed my wrinkles in my hands not getting the henna, so I added a bit extra on those areas.

Adding henna hearts
My henna paste dried pretty quickly. It cracked a bit, but my design still seemed okay. Following advice I read from henna artists, I sprayed just a bit of lemon water onto the dried henna and then wrapped my hand with toilet paper and secured it with surgical tape. Thank goodness for my husband helping me because doing this all one handed is challenging.

An easy henna design
I slept with the henna covered in toilet paper, and it did protect it. I only had a couple of dried henna pieces in my bed in the morning. I did read that some people left on their henna for 4 hours, then picked it off, but in my experience, it’s hard for me to sit still for that long, so even if you aren’t going to sleep on it, I’d wrap it so you can still move around without messing it up.
I researched wrapping with plastic wrap and many henna artists said not to do this as it can cause your hand to sweat, making the designs bleed. I noticed it bleeding a tiny bit because I sprayed a bit too much lemon water on it, so keep this in mind too. It didn’t hurt my design thankfully though.

How to wrap henna designs
I took off the toilet paper and picked off the dried henna. I could see where I should have applied it a bit more heavily on the bottom part of my hand because it was a little lighter in color. Practice definitely makes perfect with henna art!

The morning after I applied the henna
Day one gave me a lighter red color on my henna design.

Peeling off the dried henna
On day two my henna design got a bit darker, which is what I wanted.

Henna color on day one
Overall, I truly have enjoyed learning about henna designs and I will continue to try new designs.

My henna design on day two
The first time was a bit scary as I didn’t want a messy looking design on my hand for weeks, but now I know I can do it and next time will be easier. That’s pretty much how everything new in life is.

Creating my henna flower design
See the henna flower tutorial in my 1-minute video above or via my YouTube channel @carolynjbraden.
Henna Flower Design
In 2025, I tried a flower henna design. For this one, I grabbed a penny to help me make a perfect circle.

My henna flowers were easy with using a penny
I placed the penny on my hand and used it as a guide to pipe henna dots onto my hand. Quick tip: make sure you place the dots a few centimeters away from the penny.

I used a q-tip to spread the henna dots
The first time I tried the dots with the penny I put them too close to the penny and couldn’t get the penny off my hand without messing up the dots.

Piping on the henna lines
I piped on the dots, then used a q-tip to “paint” them towards the center of the “flower”, then I added more dots to the center of each flower.

I let my henna dry overnight
I piped some lines and more dots onto the my hands, let it all dry, then wrapped it in toilet paper and followed the same process as I did with the heart design (see it written above for the heart design).

Henna designs darken at day 2
At day two, the henna flower design darkened and I had cute flowers on my hand for about a week.

My Heart Flower Garden Henna
The more I practice, the better I get at henna, so I keep it going! For the design above, I created a “heart flower garden” around my wrist, did some scalloped edging and added more hearts at my fingertips. I created this around Valentine’s Day and it fit the love theme of the day perfectly!

My completed butterfly henna design
For the celebration of Holi, a Hindu celebration of spring, I created a henna butterfly. Because of all my practice, I am starting to create more detailed designs. The more you practice anything, the better you will get!

The butterfly henna design in progress
I had fun experimenting with a snake design after being inspired by my husband and I saving a snake from our pool cage AND from The White Lotus season 3 snake scene. The actor, Walton Goggins, actually got bit during scene. See me create the snake design in my 1-minute video below or via my YouTube channel @carolynjbraden:

Henna snake design
I also am experimenting in henna lettering and loved my Sun “SHINE” design, aka “love and light”.

Sunshine Henna Design
If you loved this article, then we know you’ll love this one too: Cute DIY Nail Art to Try at Home
Carolyn J. Braden is the owner of Carolyn’s Blooming Creations is a regular contributor and editor for CBC. She has been featured in numerous media publications such as InStyle Magazine, on HGTV, on Bustle.com, and more. She is the author of the books Georgia McMasters in Amethyst Lake Cemetery, How To Be Yourself: 3 Ways To Help You Being You, and the illustrator for the children’s book Bridging Connections. She is a former classroom teacher that now dedicates her life to educating others on how to live their most healthy, creative and happy life. Learn more about her visiting our About Us page.