


Carolyn J. Braden • 3 Minute Read
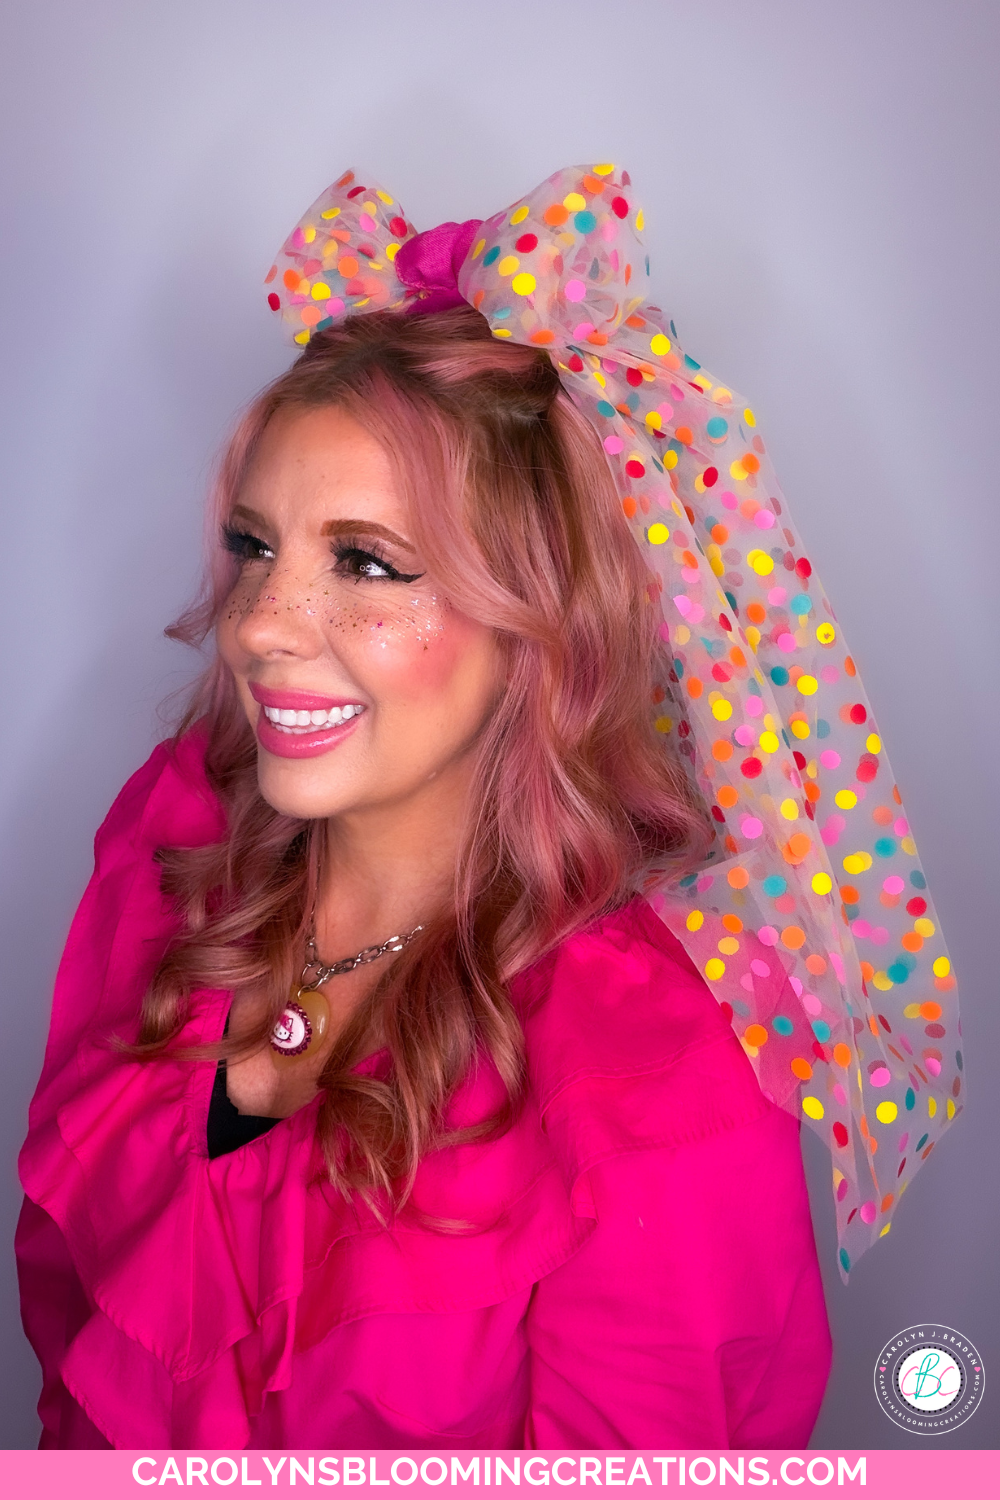
How to Create a Unique Colorful Bridal Veil with Polka Dot Tulle
If you’re a bride who loves bold style, playful details, and a touch of whimsy, a colorful polka dot tulle veil might be exactly what your wedding look needs. Traditional veils are beautiful—but adding color instantly makes your bridal style feel more you. The best part? You can easily make your own DIY colorful bridal veil at home with just a few supplies.
In this step-by-step tutorial, I’ll show you exactly how I created my own colorful polka dot tulle veil using affordable materials (including tulle I found on Amazon). This project is beginner-friendly, budget-conscious, and totally customizable.

Match your colorful veil to a colorful bouquet!
Shop the Post
Support me as a creator and shop my links with no extra cost to you! See my creation come together via my Amazon Shop plus get buying links at affordable prices!
We also love shopping CVS (the ExtraCare card savings stack helping you to save!) and here are some of our CVS finds to stock up on (especially when you get that 40% off coupon!) and love Walmart (Walmart+ gets you free shipping and delivery on many items)!
Bookmark or pin this one by clicking the Pinterest SAVE button on the images in this article for crafty magic in an instant.

I may need to make Minnie Pearl one to match!
More Product Loves
You can also get the products I’ve featured and more of my product loves via my Target shop here or my CVS Store here (use your ExtraCare card to double up on savings!) or via my shop my store here or below:
Why Choose a Colorful Bridal Veil?
Colorful bridal accessories and colorful bridal dresses are trending—and for good reason. Brides today are embracing individuality more than ever. Whether you’re planning a non-traditional wedding or just want a fun pop of personality, a colorful veil:
Adds a unique, eye-catching element to your look
Complements themed or seasonal weddings
Makes your outfit stand out in photos
It lets you express your personal style
Wear it for birthdays, bridal showers and more!
And yes—it’s absolutely okay to add color to your wedding look. Your wedding day should reflect you, not just tradition. When I got married in 2003, I had the hardest time finding a wedding dress with color.
I finally found one that was a traditional ivory dress but it had colorful floral beading down the front and had accessories to match. It was perfect at the time considering what I could find at the time, but now I think I’d want even more color, thus this veil was born! Now I need a matching dress, lol!
Where You Can Wear a Colorful Bridal Veil
A colorful polka dot veil isn’t just for the ceremony—it’s incredibly versatile! You can wear it for:
Weddings
Wedding receptions
Bridal showers
Bachelorette parties
Birthday celebrations
Engagement photos
Styled photoshoots
It’s the perfect accessory for any moment where you want to feel festive, fun, and uniquely you. I may wear it for my birthday this year! See the butterfly DIY junk trucker hat I made to wear for one of my birthdays or in my one-minute video above via my YouTube channel @carolynjbraden.

My pink hair matches it perfectly too!
Materials You’ll Need
Links go out to either the brand website, Amazon, CVS, Walmart, Sam’s Club, Target, or Lowe’s where we source our supplies based on discounts, budget and pricing. Adjust this veil to match what you like by using different types of tulle, adding different colors or even adding rhinestones if you’d like!
Check out my 1-minute video tutorial for this project on my TikTok now or below via my YouTube channel @carolynjbraden!
62-inch colorful polka dot tulle (I purchased mine from Amazon)
Hair comb (I used a yellow one to match the tulle)
Needle and thread (I matched my thread to the ribbon and tulle)
Pink felt (I had a set from Amazon)
Scissors
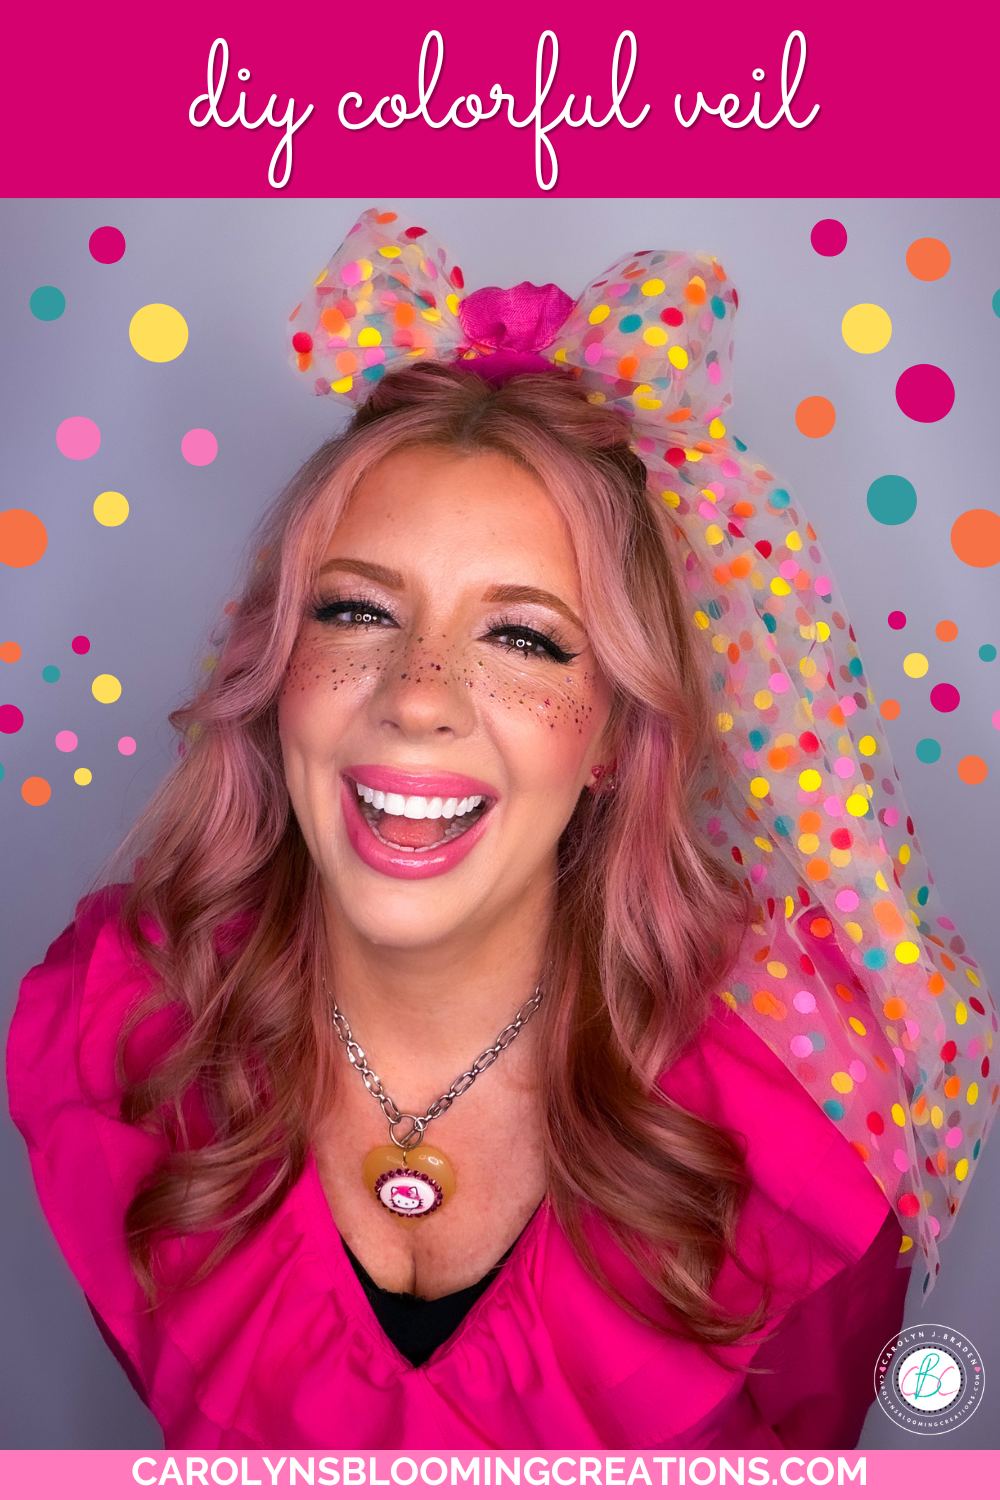
I love how it turned out!
Step-by-Step: How to Make Your Colorful Polka Dot Veil
1. Cut Your Tulle Pieces
Start with your 62-inch piece of polka dot tulle (I had to trim the ends that weren’t printed, which made my piece 62 inches). Cut it into:
Two 24-inch pieces (these will form your veil layers)
One 14-inch piece (this will be used to create the bow)

Making the wide stitches
This combination gives you a layered, slightly full veil with a playful bow accent.
2. Create the Veil Layers
Take your two 24-inch pieces and lay them together.
Using a wide stitch, sew along the top edge of both pieces (I stitched at the less wide ends so my veil would be a bit longer)
Gently pull the thread to gather (pleat) the tulle
Adjust the gathers until the width matches your hair comb

Pull the stitches to gather them together
This creates that soft, classic veil drape with added volume.
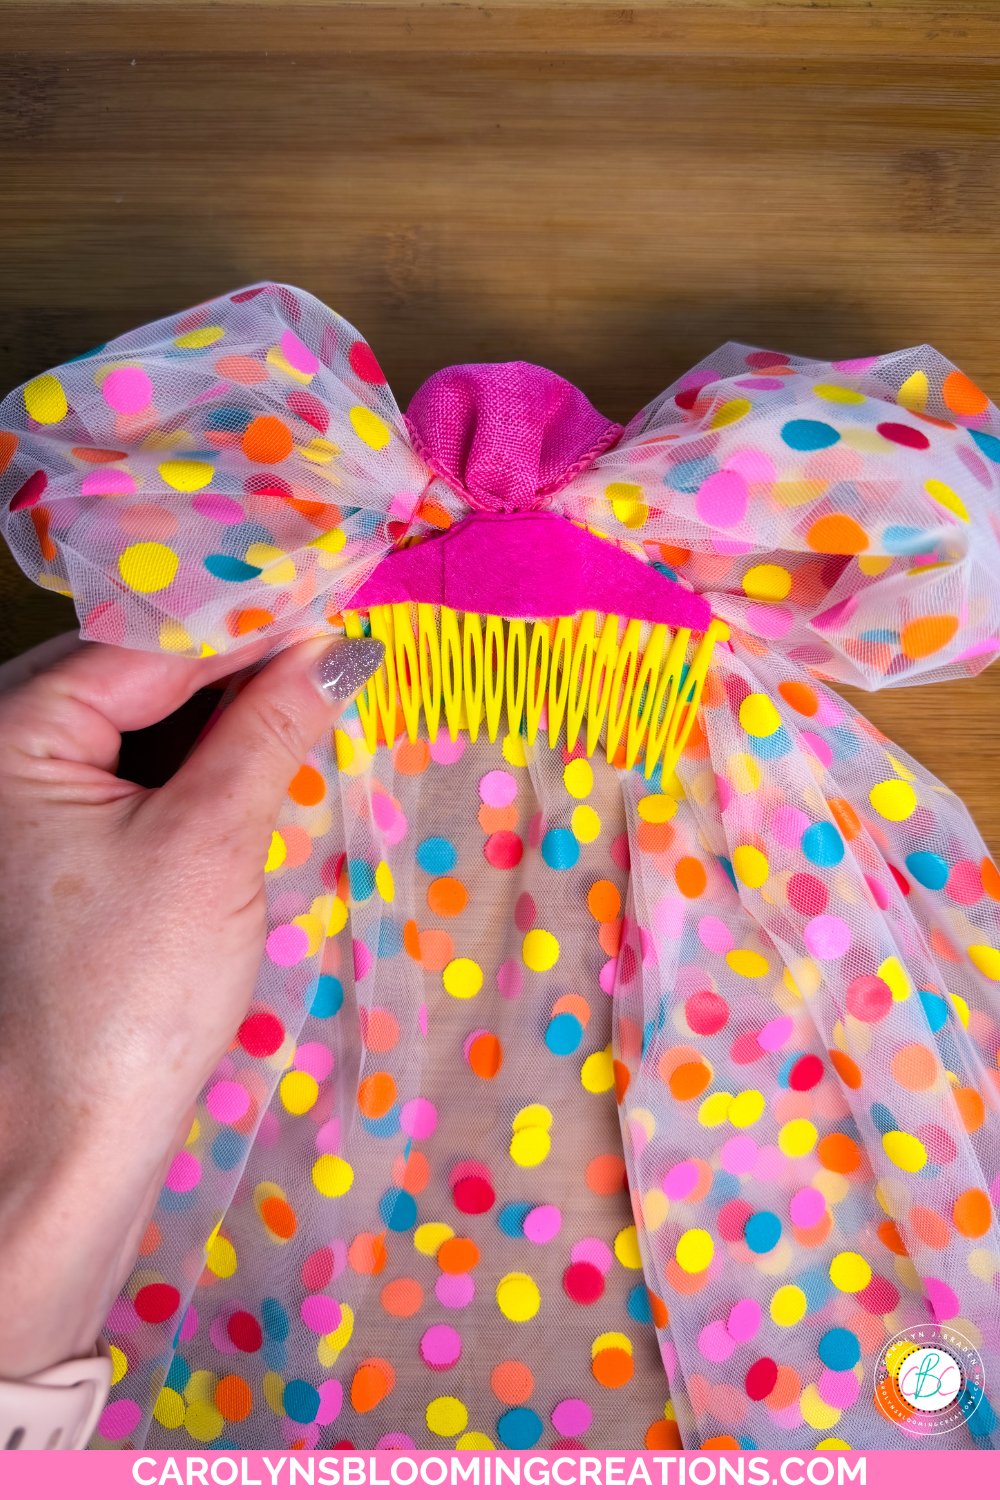
3. Attach the Veil to the Comb
Once your tulle is pleated:
Use a needle and thread to securely stitch the gathered edge onto your hair comb
I placed it on the underside of the comb, flipping it over the front to give it a bit of volume.
Make sure it’s tightly fastened so it stays in place when worn
This is the foundation of your veil, so take your time here for durability.

Making the bow
4. Create and Add the Bow
Using your 14-inch piece of tulle:
Shape it into a bow by folding it, then pinch it in the middle
Stitch it onto the top of the veil near the comb
I was going to leave it as a loose bow, then I decided to fold the ends back towards the top of the veil and made it a shorter, poufy bow. It was a last-minute design decision that you can change and adjust to fit what you want.

Stitching the bow on the veil
To elevate the look, I added a soft, feminine detail:
Stitch pink wired ribbon onto the bow center for structure and color contrast
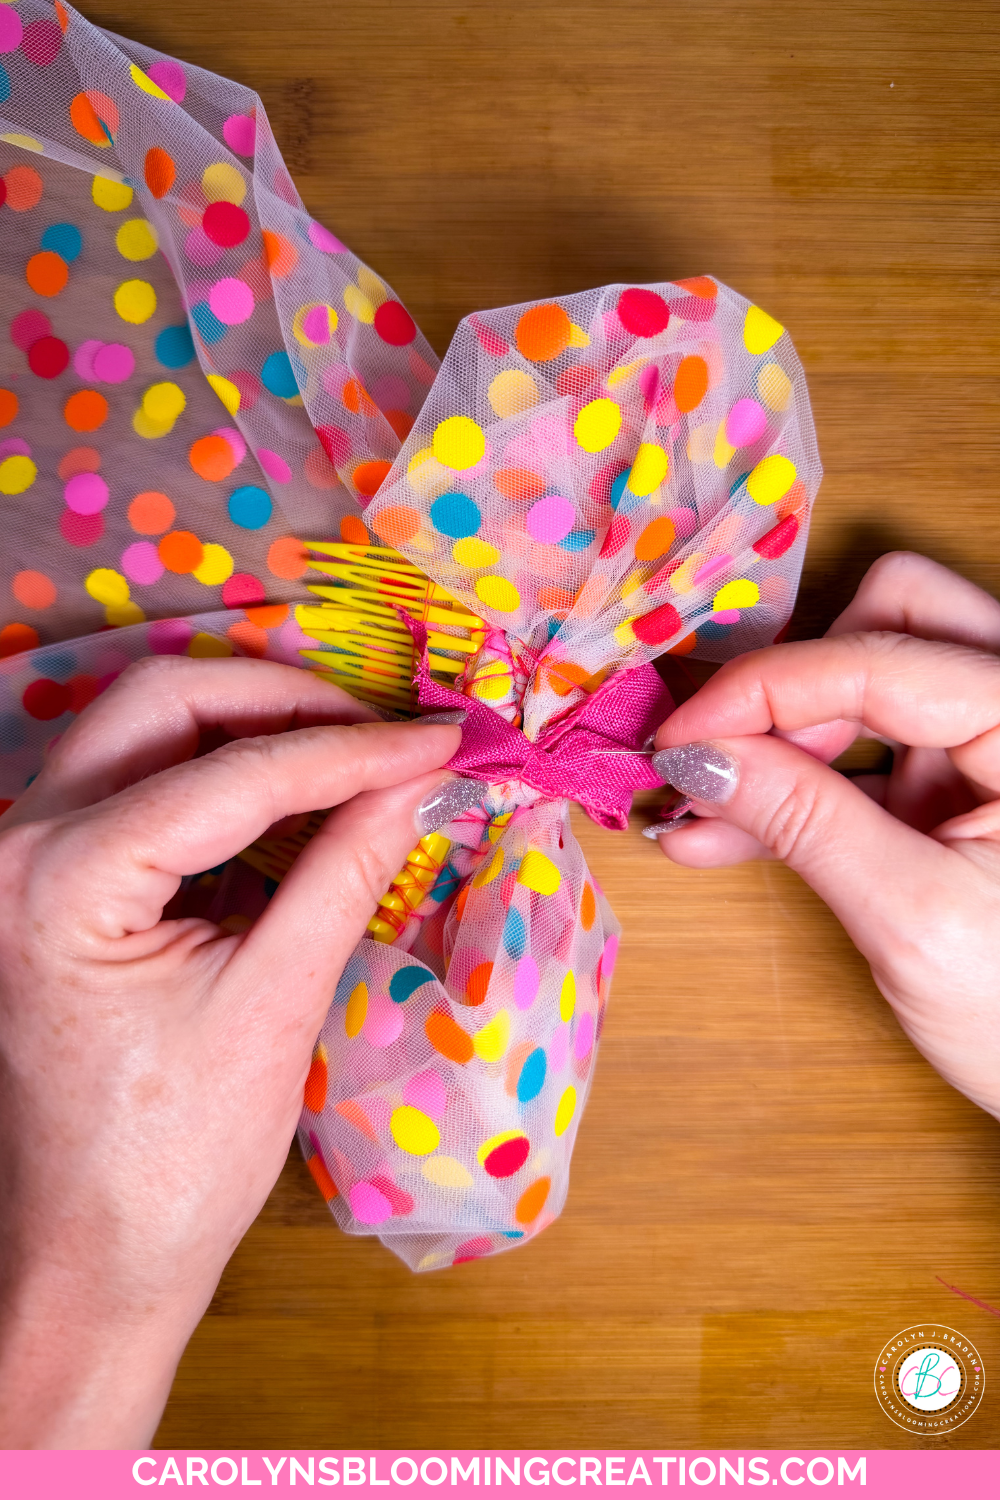
Stitching on the ribbon to finish the bow
5. Finish the Underside
To give your veil a polished, professional finish:
Cut a small piece of pink felt
Use Aleene's Original Tacky Glue to glue it over the underside of the comb

Gluing on the felt to cover the thread
This step hides stitches and makes the comb more comfortable to wear.
Final Thoughts
Creating your own colorful bridal veil is not only budget-friendly—it’s also a meaningful way to add a personal touch to your wedding look. This DIY polka dot tulle veil is playful, stylish, and completely customizable to your color palette and vibe.
The backside of the veil
Don’t be afraid to break tradition. Whether you go bold with bright colors or keep it soft with pastels, your wedding style should reflect your personality. A colorful veil is the perfect way to make that statement.
Take Action
If you try any of my ideas, let me know how it turned out—or tag me when you try them because I LOVE seeing your posts💚 If you tag me using @carolynsbloomingcreations or @carolynjbraden, I’ll see it! Or tell me about it in the comments below.
If you loved this article, we know you’ll love this one too: DIY Leather Shoe Makeover: Transform Old Shoes with Paint and Simple Tricks
Carolyn J. Braden is the owner of Carolyn’s Blooming Creations is a regular contributor and editor for CBC. She has been featured in numerous media publications such as InStyle Magazine, on HGTV, on Bustle.com, and more. She is the author of the books Georgia McMasters in Amethyst Lake Cemetery, How To Be Yourself: 3 Ways To Help You Being You, and the illustrator for the children’s book Bridging Connections. She is a former classroom teacher that now dedicates her life to educating others on how to live their most healthy, creative and happy life. Learn more about her visiting our About Us page.