


Carolyn J. Braden • 3 Minute Read

How to Make Pearly Seashell Beachy Trees
These seashell and pearl trees have been in my creative mind for a long while. I created other seashell trees out of pearly iridescent Sea Pen shells and had another idea to create more trees out of my other favorite shells, the Fighting Conch. I found some macramé rope at a thrift store (it was brand new) and thus these new beachy trees were born. Read on to learn how to make pearly seashell beachy trees.

One of the set of three seashell trees
All Year-Round Holiday Decor
I am a big fan of decorating trees for all seasons. If you love the holidays, then why not have a small tree out that you can decorate for any season? If you don’t want trees, my mother-in-law loves to decorate a tiered tray with seasonal décor and small trees can work the same way. See a similar tray here on Amazon. I made cute Valentine trees (see them here) and you can make them in different colors for different seasons.

My pup, Minnie Pearl, modeling my beachy decor
Here are some more interchangeable décor we LOVE:
Interchangeable Welcome Door Sign, Amazon, $21
Interchangeable Welcome Sign for Porch, Amazon, $44
Interchangeable Home Sign Décor, Amazon, $27
Interchangeable Holiday Soap Dispenser, Amazon, $30
Interchangeable Gnome Holiday Sign, Walmart, $22
Welcome to Our Classroom Interchangeable Sign, Temu, $9

The variety of shells I used were among my favorite finds
More Seashell Crafts
When I first visited Sanibel Island in the year 2010, I fell in love with the seashell lined beaches. It’s no wonder I ended up moving to the island in 2020. Every time I looked at the seashells I brought back to my Kentucky home at the time (I only took shells without animals, of course!), it brought back wonderful memories of the little island. After Hurricane Ian destroyed much of the island in 2022, it’s rebounding and thankfully the beaches and shells are still there and are lovely.

Side view of the seashell trees
Over the years, I’ve made many seashell crafts. The very first one was a seashell wreath. See it below or via my YouTube channel @carolynjbraden. Here’s the link to my butterfly seashell ornament that is made with other shells.
Project Supplies + Discount
Now for the project. These trees came together in a few hours and can be tailored to your own tastes. I chose to use shells and pearls to decorate mine but there are plenty of other charms and décor out there that you could use instead.

The seashell trees fit in with my coastal home decor
If you want to create similar trees, here is what you need. If you shop Temu (I got some of my supplies from Temu as their prices were very budget friendly) and are a new user, use my link here or my code afe55197 for 30% off.

Some of the seashell tree supplies
3 mm Macramé cord (I got mine at a thrift store, didn’t even use the whole skein, here’s similar rope on Amazon, I used a cream and a sand color)
8 mm Macramé Cord (Amazon)
Paper Cones (I got a variety pack of assorted sizes on Temu, but Amazon has them too, I made a 13.75 inch tree, a 10 inch tree and a 5.9 inch tree)
Ivory Flatback Pearls in Various Sizes (I got mine on Amazon and it came with a wax pencil and glue that you could use instead of the Liquid Fusion)
Variety of shells (I found mine EMPTY on the Sanibel beaches, but you can get similar shell sets on Amazon and Walmart)
Resin Starfish (Amazon)
Scissors
Get my 1-minute video tutorial for this project below or via my YouTube channel @carolynjbraden:

Adding the large cord to the bottom of each tree
How-To:
Heat your glue gun up to a low heat setting. Apply some glue to the bottom of a paper cone and add your 8 mm macramé cord to the glue. Repeat on each of the cones (I made three), cutting the cord off after it has been applied to the bottom of each cone.

Gluing the doubled up macrame cord
Next, add some more glue above the thicker macramé trim (I worked in small sections) and start gluing on the two colors of thinner macramé rope. I doubled them up, added some glue to the tree and slowly added them to the glue, both colors at a time.

Slowly covering the trees in macrame cord
I added glue, then spiraled the macramé around each cone. I made sure to spiral the cord close together so you wouldn’t see the paper cone underneath. I found that pushing down on the cord a bit after attaching it to the glue helped make the gaps between the cord less.

Finishing off the top of the tree
At the top of the tree, cut the cord off and glue the top to completely cover the tip of the cone.

Adding a resin starfish to the top of each tree
I added hot glue to a resin starfish to the top of each tree.

Hot gluing on the shells to the fronts of the trees
I glued shells to the front of each tree, starting with the largest shells, then sporadically added more down the front of the tree. I layered some and kept adding shells until they looked right to my creative eye.

Adding a pearl to the center of each starfish
I randomly added some Liquid Fusion to the shells and used my wax tip pencil to grab some pearls and added them to the glue. I made sure to add a thin layer of glue so they wouldn’t slide and ooze off.
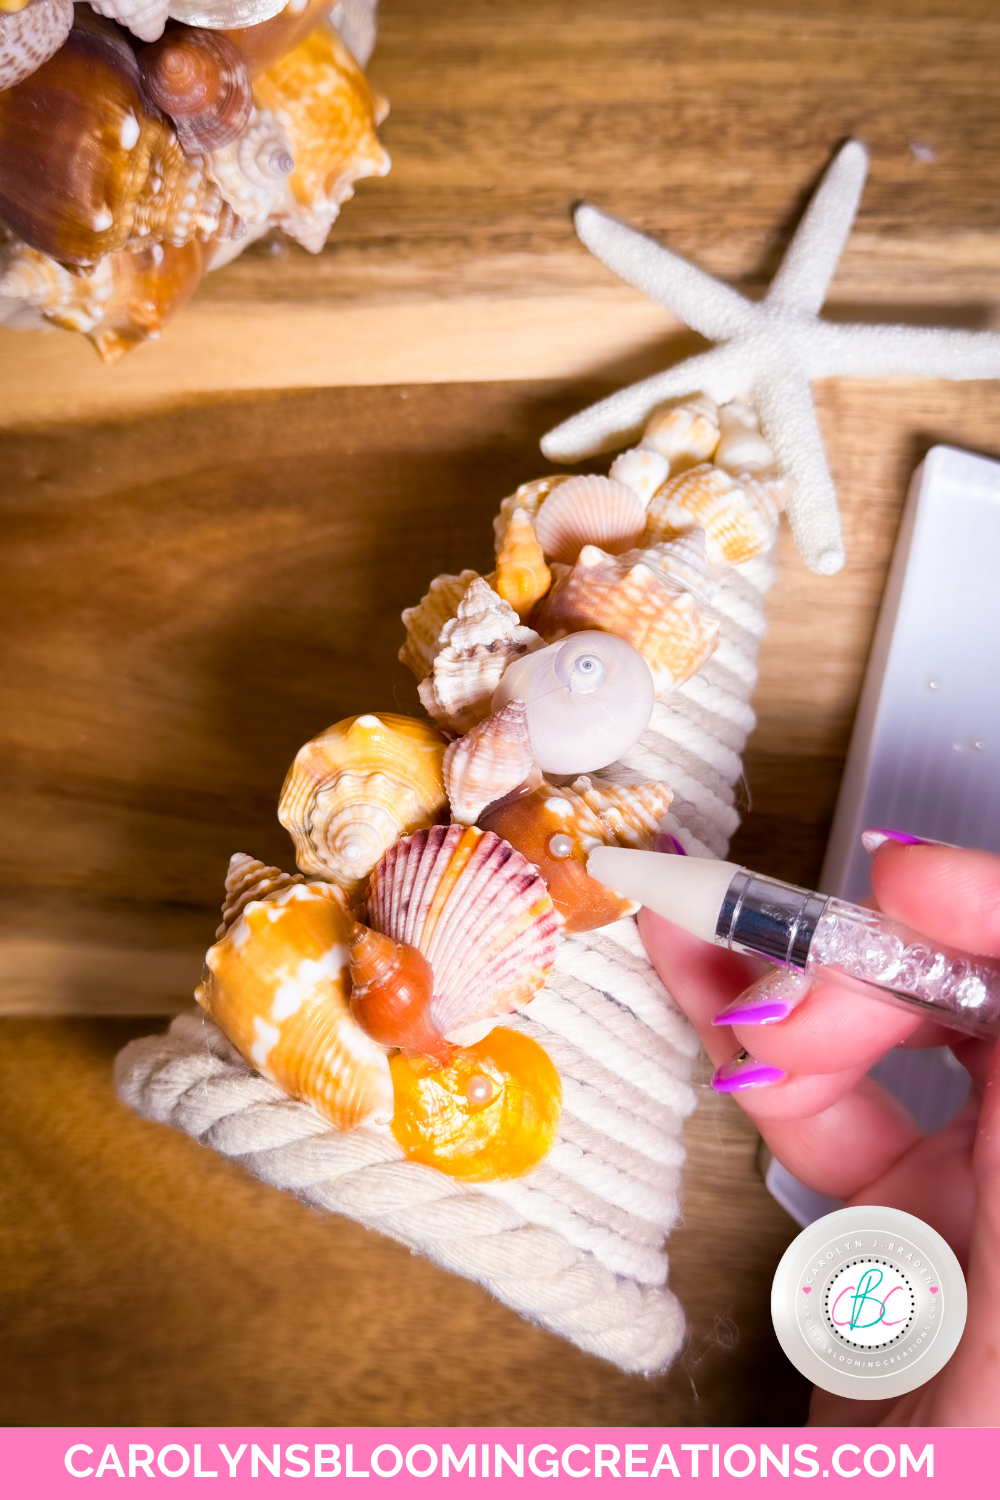
Adding ivory pearls sporadically around the shells
I added some Liquid Fusion glue to starfish toppers and added a larger flatback pearl to each.

My completed seashell and pearl beachy trees
I allowed them to dry overnight and then they were ready for my beachy entryway table. I made these in February and will keep them up until my next holiday table décor project.

A close up look at the pearls on the shells
They are very simple, but super cute! If you try to make some, let me know how they turned out in the comments below!

My Pearly Seashell Beachy Trees
If you loved this article, then we know you’ll love this one too: How to Make Seashell Christmas Trees
Carolyn J. Braden is the owner of Carolyn’s Blooming Creations is a regular contributor and editor for CBC. She has been featured in numerous media publications such as InStyle Magazine, on HGTV, on Bustle.com, and more. She is the author of the books Georgia McMasters in Amethyst Lake Cemetery, How To Be Yourself: 3 Ways To Help You Being You, and the illustrator for the children’s book Bridging Connections. She is a former classroom teacher that now dedicates her life to educating others on how to live their most healthy, creative and happy life. Learn more about her visiting our About Us page.