


Carolyn J. Braden • 3 Minute Read

How to Create a Modern Beehive Bun Hairstyle
Maybe it’s from watching clips of Bob Fosse dance choreography in movies or perhaps my love of Brigitte Bardot’s sense of style, but I love an EASY bun hairstyle. I started wondering how a beehive hairstyle was created for many of the movie clips I watched, did some experimenting and figured out my own version of a beehive. Read on to learn how to create a modern beehive bun hairstyle.

This hairstyle works well with the Peacock Fascinator I created
Why I Like Bun Hairstyles
My early background was in dancing and I loved having my hair done for performances. I liked it when my hair was out of my face, so I often wore it up or in braids. A bun is a classic hairstyle worn by many dancers. A ballerina bun, or the ballet bun is different than this tutorial, but you can see the influence of it in my hairstyle creation here in this ballerina bun history by The New York Times.

It pairs well with my 60’s inspired dress
My Modern Beehive
I took the concept of the ballet bun by slicking back my hair into a ponytail to start, but then used the concept of the beehive hairstyle of teasing my hair until I could get a “beehive like” effect for the bun. The beehive hairstyle of the 1960’s and 1970’s was high, very teased, and looked similar to a honey bee’s traditional beehive shape. See some examples of beehive hairstyles on this article from Byrdie. I wanted to modernize the look.

This hair pairs well with summer dresses
Butterfly Clips
You do not have to use the butterfly hair clips I used or any at all. I liked adding them to give it a different look as the butterflies move when I move! See my GOLD butterfly hair tutorial in my 1-minute video below, via my website here, or via my YouTube channel @carolynjbraden:
How-To Create a Modern Beehive Bun Hairstyle
This modern beehive hairstyle is very quick and easy and works best with hair that is more on the long side. If you have shorter hair, you could try adding a donut bun to add some volume like I did in my 1-minute YouTube video tutorial.

My full 60’s look
I did this style on third day hair, when my hair has enough grip to hold a hairstyle. If you are doing this on clean hair, you’ll need to add some texture to make it last. Here are some tools I used with links to buy.
Dry Shampoo to add texture/absorb oil (I love Viori Coconut and Vanilla, use my code CAROLYNBRADEN or this link to get 10% off any order) or I also like Not Your Mother’s
Beachwaver Braid Balm (tames flyaways, Amazon)
Magic Grip hair pins (Love these for all kinds of updo’s, Amazon, you could also use bobby pins)
Brush (I like my UnBrush or my Spornette Boar Bristle brush)
Ponytail holder (I like seamless ones, get them on Temu or Amazon)
Optional: Moving butterfly hair clips (Temu or Amazon), glitter spray for hair
Get the 1-minute video tutorial above or via my YouTube channel @carolynjbraden.

The top view of the hairstyle
Here’s how I did it:
Add some dry shampoo to your hair roots and some to the strands if it’s clean or 2nd or 3rd day like mine. The dry shampoo adds texture to clean and “dirty” hair, and absorbs oil on “dirty” hair. For the Viori, I sprinkle it from the canister, rub it into my roots, then brush it out. For spray dry shampoos, spray it at your roots and strands, then brush it out.

Slicking back my hair into a ponytail
Slick your hair into a ponytail, using a brush or a teasing brush to smooth out lumps. I used some Beachwaver Braid Balm to tame flyaways and make it look sleeker.
Tease your ponytail A LOT! I teased it using my teasing brush.

Teasing my ponytail
After I teased it, I used my hands and a brush to smooth my hair a bit (tamed the wild “tease”), then wrapped my teased ponytail around my ponytail holder to create a high bun.
I used my hair pins to secure my wrapped bun to my head. I slid in several hair pins around the front and the back until I felt it was secure.
I sprayed my hair with lots of hairspray and also used some more braid balm to sooth fly-aways.

Adding the hair clips
I then added some of the moving butterfly hair clips on the bun and around it. I added some to the back too, just to give it a 360-degree completed look.

The backside of my bun
I also added one of the butterfly clips to my floral vintage Hawaiian dress to coordinate the full look.
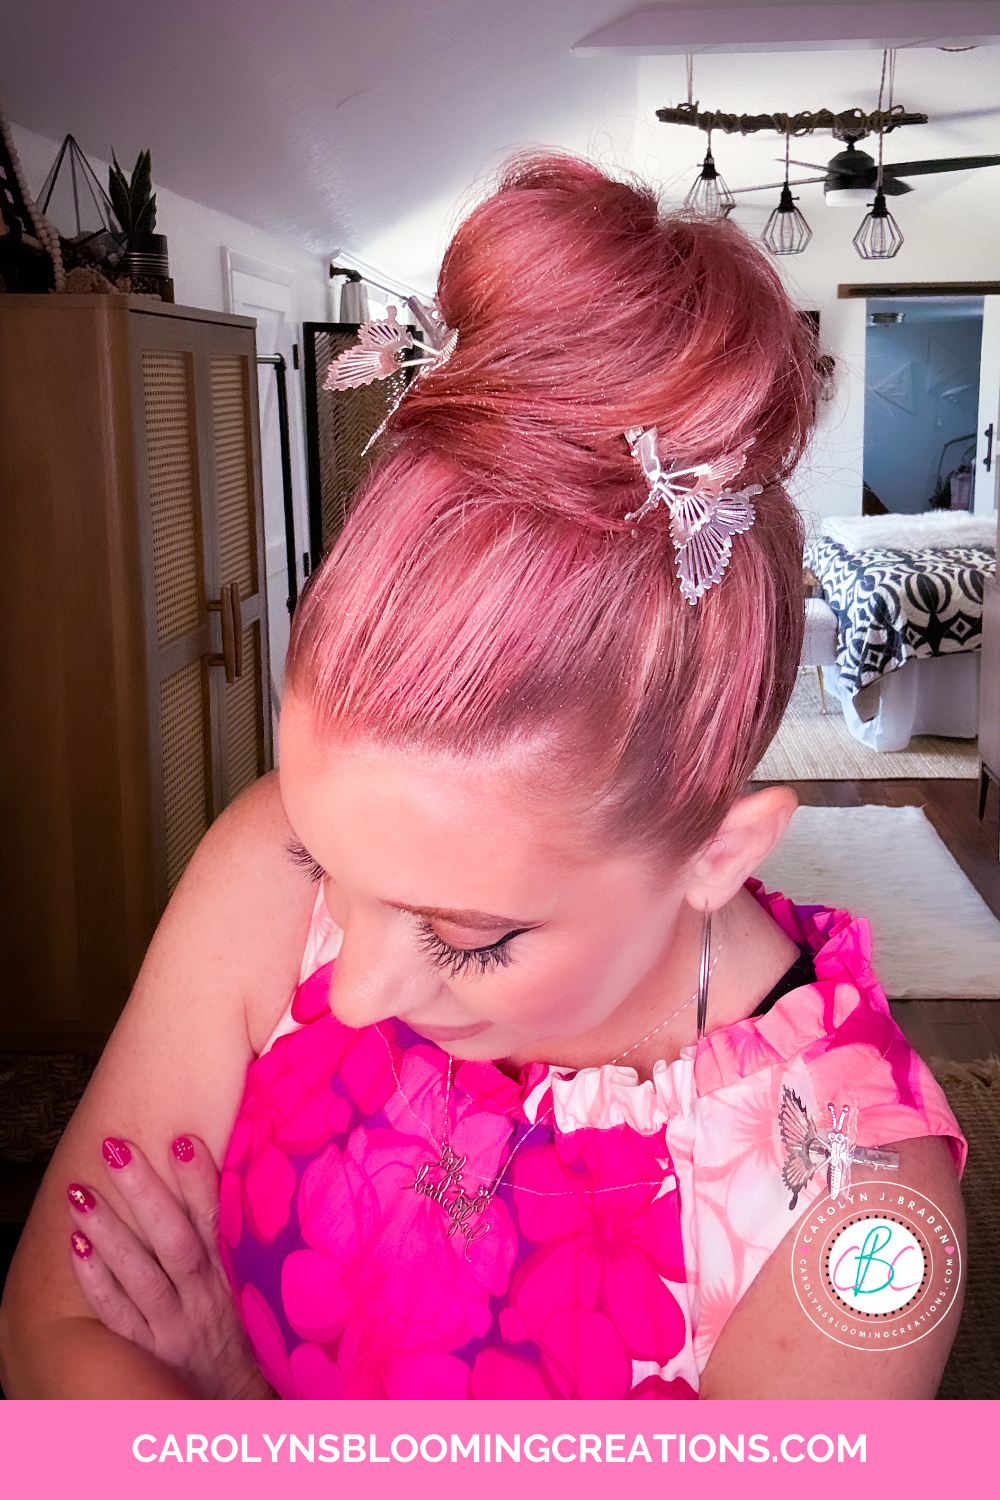
I sprayed some glitter spray in my bun too
This bun can be worn on its own, or it can be worn with a fascinator. I’d wear this look to the Kentucky Derby with a fascinator, or with the clips to a wedding as a guest or attendant. I had a similar hairstyle to this for my own high school prom and know it’d be cute for modern proms too.

A completed look with the hair and fashion
I also wore it with a 1960’s style dress and pink go-go boots I had from creating another look. See more of that dress and my 60’s look in this article here on my website.
If you loved this article, then we know you’ll love this one too: How to Create a Garden Party Fascinator
Carolyn J. Braden is the owner of Carolyn’s Blooming Creations is a regular contributor and editor for CBC. She has been featured in numerous media publications such as InStyle Magazine, on HGTV, on Bustle.com, and more. She is the author of the books Georgia McMasters in Amethyst Lake Cemetery, How To Be Yourself: 3 Ways To Help You Being You, and the illustrator for the children’s book Bridging Connections. She is a former classroom teacher that now dedicates her life to educating others on how to live their most healthy, creative and happy life. Learn more about her visiting our About Us page.